AWS Fundamentals - Part 8: Simple Storage Service (S3)
20 Feb 2019The Simple Storage Service (usually referred to as S3) was one of the earliest - and one of the best known - services available from AWS. But what exactly is it and what does it provide? At the most basic level, S3 provides users with the ability to store objects in the cloud and access them from anywhere in the world using a URL. What do I mean by ‘objects’? An object can be pretty much anything you like - files, images, videos, documents and so on. One of the defining characteristics of S3 is that for all practical purposes, it provides an unlimited amount of storage space in the cloud. Users of S3 pay only for the storage they use on a per Gb basis. There are also charges to retrieve data - these charges vary depending on which tier of storage you are using.
Whereas S3 is designed for every day storage purposes, S3 Glacier(recently renamed from ‘Glacier’) is designed for long term storage and archival and is priced with this in mind (i.e. it is cheaper to store data). However, the trade-off is that retrieving data from S3 Glacier can take longer than with regular S3 storage, plus it is typically more expensive to perform those retrieval operations.
Durability of Data
Data durability refers to how likely it is that data will be subject to corruption or loss. AWS state that the S3 Standard, S3 Standard-IA and S3 Glacier tiers are designed for 99.999999999% durability. What that works out to is that if you store 10,000,000 objects in S3, you could expect to lose a single object once every 10,000 years. So, there’s still a chance, but I wouldn’t be losing any sleep over it.
How do AWS achieve these levels of durability? A major factor is that data is stored on multiple devices across availability zones. So if I write an object to S3, that data is stored redundantly across multiple AZs (normally three) and a SUCCESS message is only returned once this has been done. There are other mechanisms in place to detect data corruption, such as MD5 checksums and CRC checks - all of this adds up to an extremely reliable system.
S3 Storage Tiers
To provide the maximum amount of flexibility, AWS provides a number of storage tiers, each with differences in pricing and capabilities (such as retrieval times). I’ll cover the tiers available at the time of writing, but be aware that AWS do occasionally add new storage tiers, so it’s worth checking the AWS documentation.
Firstly, there is the S3 Standard tier. This is the ‘original’ S3 storage tier and is widely used for ‘general purpose’ storage. It is highly available (99.99% over a year) and resilient and tends to be the ‘default’ option when users need frequent access to their data.
Secondly, there is the S3 Standard - Infrequent Access (S3 Standard-IA) tier. This tier is similar in many ways to the S3 Standard tier, however the main difference is that it is designed for data that needs to be less frequently accessed, therefore the per Gb storage costs are cheaper. However the trade-off is that it costs slightly more to retrieve that data. S3 Standard-IA is also designed for a slightly lower availability (99.9%) compared to S3 Standard.
Next up is S3 Standard - One Zone Infrequent Access (S3 Standard-One Zone-IA). As you can probably guess from the name, the primary difference with this tier is that data is not copied across three availability zones as is the case with the previous two tiers we discussed. Because of that, availability drops slightly (to 99.5%), plus there is a very small risk that data could be lost in the event of an availability zone being destroyed.
A more recent addition to the family is S3 - Intelligent Tiering. The idea behind this tier is that AWS will automatically move data between tiers on your behalf, with the goal of ensuring that your data is always kept in the most appropriate tier, cost wise. For example, if S3 notices that some data hasn’t been accessed for 30 days, it will automatically move that data into the Infrequent Access tier. If that data is accessed, S3 will move it back into the S3 Standard (frequent access) tier.
S3 Glacier is the ‘original’ Glacier service, now brought into the main S3 family and designed for archiving of data. Glacier provides very cheap storage and different options for data retrieval, depending on how quickly you need to get that data back (costs differ accordingly).
Announced at re:Invent 2018, S3 Glacier Deep Archive will provide the lowest cost storage option available from AWS - this tier is designed for data that needs to be retained on a longer term basis (for example, 10 years or longer). It offers an alternative to tape based storage systems, with retrieval times of up to 12 hours.
Now that we’ve seen the different storage tiers available, let’s dive in and start to look at how S3 actually works.
S3 Buckets
Before you can store anything in S3, you need to create a bucket. A bucket is really nothing more than a folder that will be used to hold your storage objects - it is a place for you to store your own objects in the cloud, and which no-one else can gain access to (unless you grant access). You can create a bucket easily using the S3 API, CLI or AWS console:
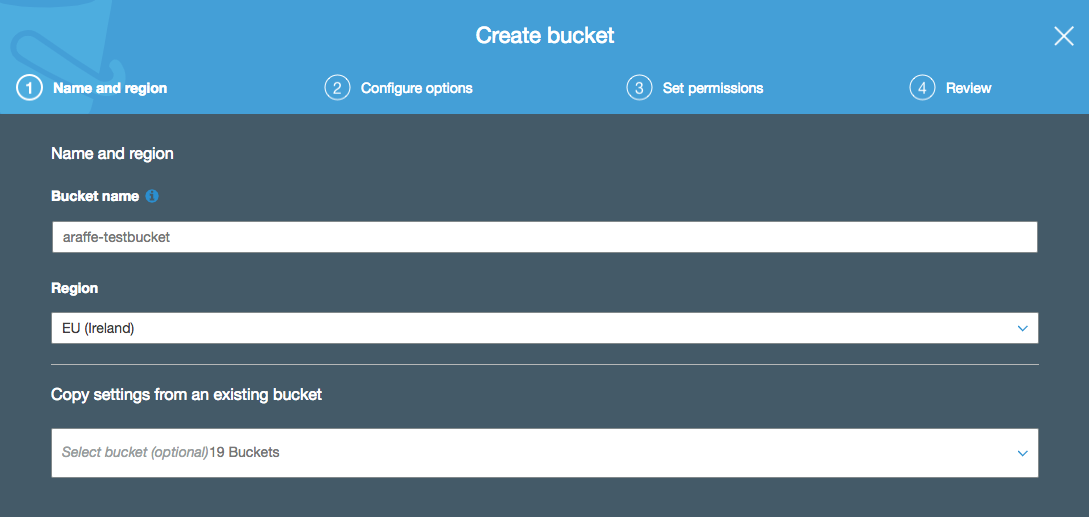
Notice in the above screenshot that I’m being asked for a bucket name - in this example, I’m calling it ‘araffe-testbucket’. I could have tried calling it simply ‘testbucket’, but that probably wouldn’t have worked - the reason for that is that S3 bucket names must be globally unique. By globally unique, I don’t just mean they need to be unique within your account - they have to be unique everywhere (i.e. the whole world). So if another user of S3 has taken the bucket name ‘testbucket’ (quite likely), I won’t be able to use it. It’s probably unlikely that someone else has used ‘araffe-testbucket’ though, so I should be safe with that one.
If you’re more a fan of the command line, you can create a bucket using the following syntax:
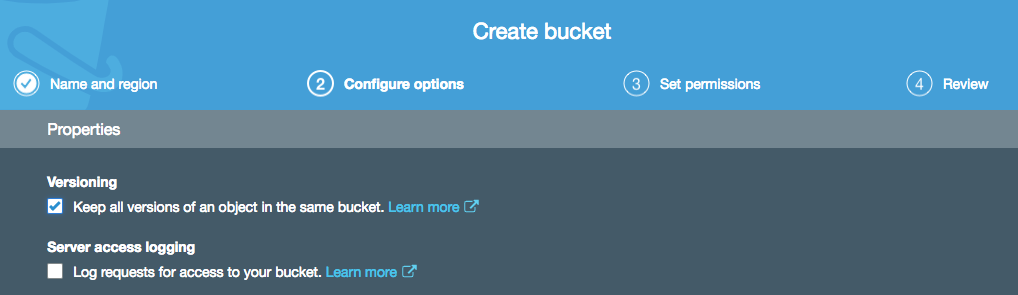
aws s3 mb s3://araffe-testbucketThere are a number of other options you can configure while creating your bucket, some of which I’ll cover later. However, there is one important configuration item we should deal with now - public access to buckets.
Public Bucket Access
If you follow the bucket creation config pages all the way through, eventually you’ll be presented with a page that asks you to consider the public access settings for your bucket:
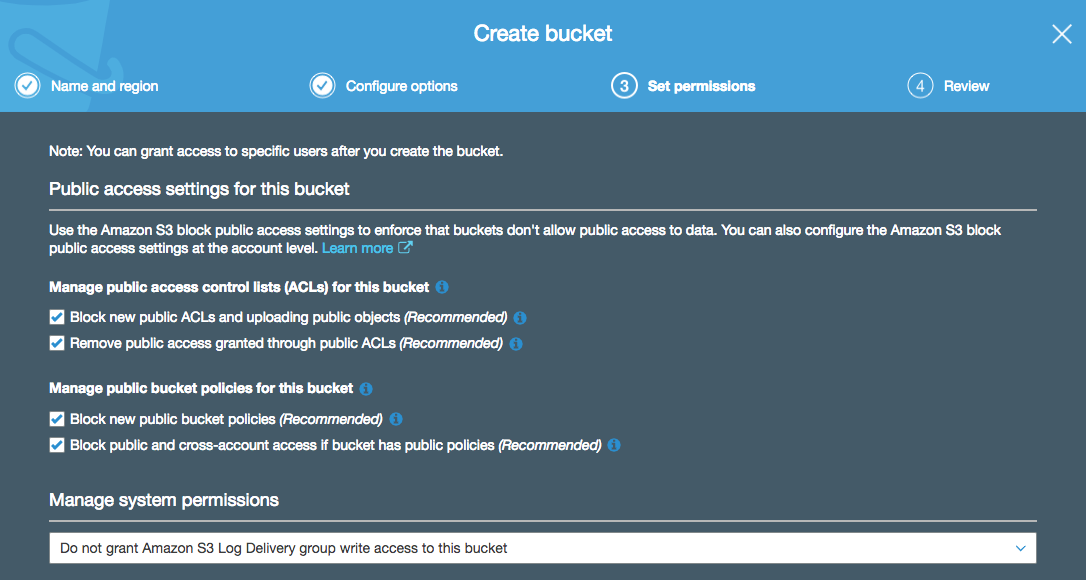
What this page is actually asking you is: “Do you want to prevent anyone from applying a policy that will make your bucket open to the public? Or would you prefer to untick these boxes and potentially allow access into your bucket from the entire universe?”. Public access to your bucket is exactly how it sounds - the ability for anyone in the world to access objects inside your S3 bucket. OK, there are a few use cases for this, but in general this is something you probably want to avoid doing.
If I untick the boxes in this dialog box and then go on to alter the permissions for my bucket to make it public, I’m presented with a large warning banner informing me of my potential stupidity:
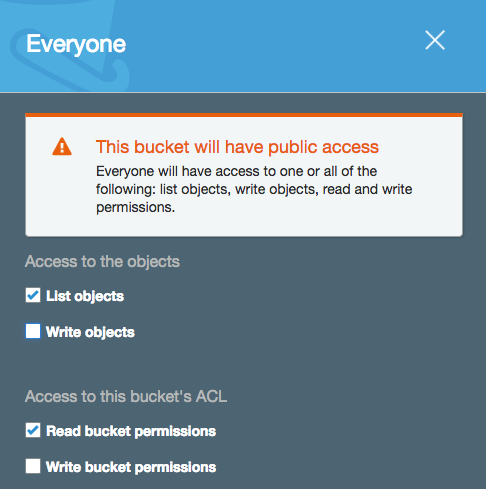
So, you can’t say you weren’t warned :-).
Bucket Policies
In the Identity and Access Management (IAM) post, I mentioned that there were two types of policy - identity based and resource based (where a policy is applied directly to a resource rather than a principal). An S3 bucket policy is one example of a resource based policy and allows you to grant access to your S3 resources.
Let’s start with a simple example. Say I want to allow read access into a specific S3 bucket from anyone (i.e. anonymous access). As I mentioned earlier, allowing public access to your S3 buckets isn’t generally the best of ideas, but there might occasionally be reasons for doing so (running a static website on S3 and therefore needing people to access objects). Going back to the bucket I created earlier, if I click on it in the console and then on ‘permissions’, I see ‘Bucket Policy’ in the list of options I have:
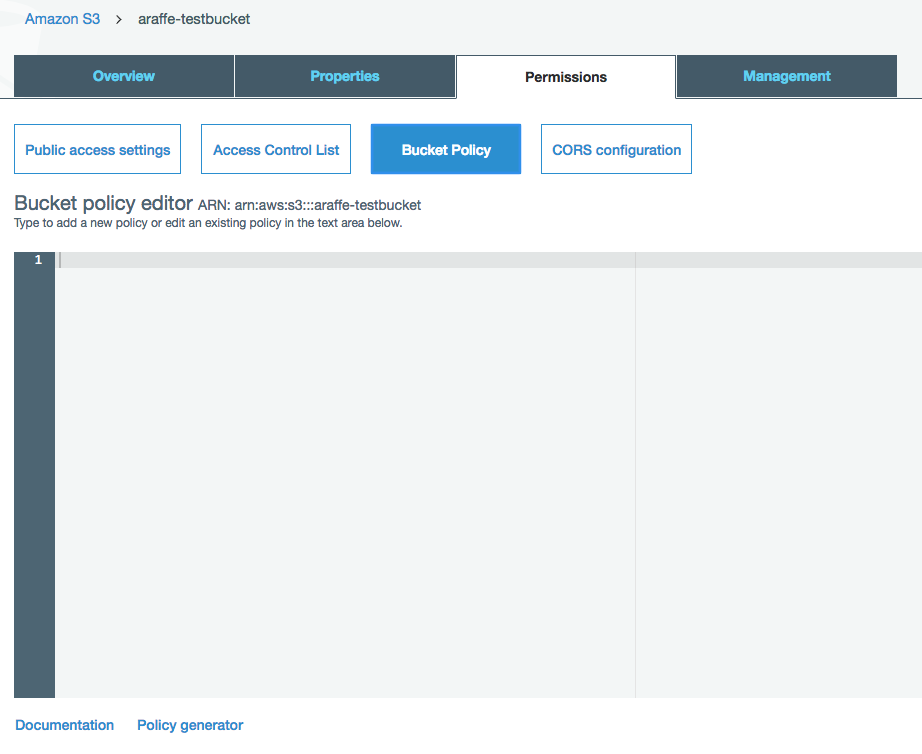
OK, so now I have a ‘bucket policy editor’ - what do I put into that? Well, the language is actually the same as we saw earlier in the IAM post, using resources, actions, effects and so on. So if I want a policy that allows anonymous access to my bucket, I could use a policy as follows:
    {
      "Version":"2012-10-17",
      "Statement":[
        {
          "Effect":"Allow",
          "Principal": "*",
          "Action":["s3:GetObject"],
          "Resource":["arn:aws:s3:::araffe-testbucket/*"]
        }
      ]
    }
Note that in order to apply this policy, I would first have to untick the option that blocks public access in the ‘public access settings’ dialog that we discussed in the section above.
Here’s another example: imagine I want to allow access into my S3 bucket only from a certain range of IP addresses. Here’s how the policy might look:
    {
      "Version": "2012-10-17",
      "Statement": [
        {
          "Effect": "Allow",
          "Principal": "*",
          "Action": "s3:GetObject",
          "Resource": "arn:aws:s3:::araffe-testbucket/*",
          "Condition": {
             "IpAddress": {"aws:SourceIp": "54.240.143.0/24"},
          }
        }
      ]
    }
You might be thinking to yourself that the idea of writing these policies out by hand is a bit daunting - if that’s the case then have no fear, because at the bottom of the bucket policy editor screen (shown above), there is a link to a policy generator. This will guide you through the process of defining your policy using drop down boxes and then present you with the policy document at the end, which you can simply cut and paste into the bucket policy editor.
Uploading and Download Data from S3
OK, so you’ve created an S3 bucket. That’s very nice, but not all that useful unless you can actually get some data into that bucket and download it when you need to.
Uploading an object to S3 using the AWS management console is one of the simplest operations you can do - you simply click on the bucket that you have created and then click on ‘Upload’. From here, you can drag and drop or select files from your local computer:
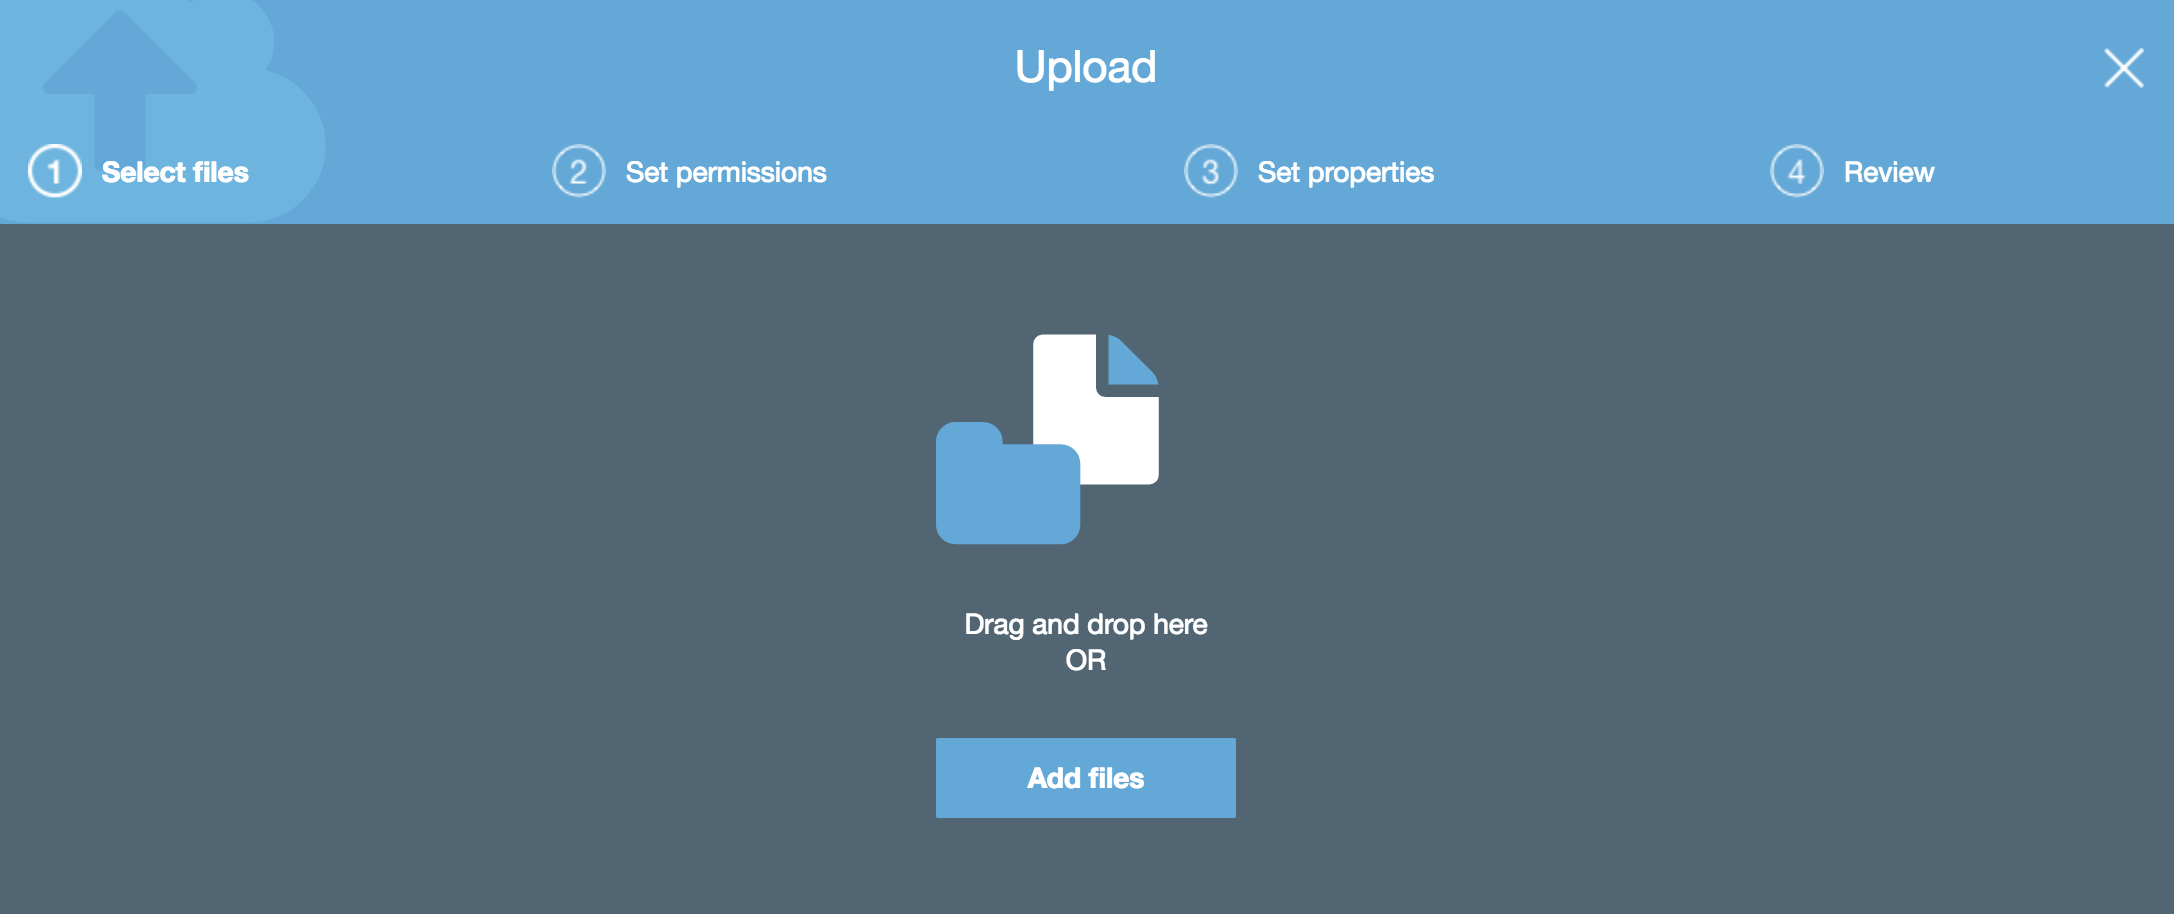
Once you’ve chosen the files you want to upload, you can set permissions on them and choose which storage tier (Standard, Standard-IA, etc) the objects will use.
To download objects using a browser, you can get the URL for any given object by checking the box next to it in the S3 management console - a box will open on the right hand side of the screen showing information about the object, including the URL for the object. If the person using the URL has permission, they will be able to download that object.
Using the aws s3 cp Command
If you aren’t a fan of graphical interfaces and would rather use a CLI based tool to move your data around, you can use the AWS CLI to copy data instead.
The ‘aws s3 cp’ command is very flexible and allows you to perform all sorts of operations, including setting permissions, managing encryption, setting expiry times and more. Let’s look a couple of simple examples to get started:
Firstly, you can use the aws s3 cp command to copy a single file from your local machine to your S3 bucket - in this case, I am copying a file named ‘hello.txt’ from my laptop up to my ‘araffe-testbucket’ bucket in S3:
aws s3 cp hello.txt s3://araffe-testbucket/hello.txt
upload: ./hello.txt to s3://araffe-testbucket/hello.txt
You can see that the operation has succeeded by the output after the command has executed (you can also check using the management console of course).
I can also copy the file back from S3 to my local machine:
aws s3 cp s3://araffe-testbucket/hello.txt hello.txt
download: s3://araffe-testbucket/hello.txt to ./hello.txt
What if I want to copy a large volume of files and directories to S3 at once? I can use the ‘–recursive’ switch to copy a complete directory structure, for example if I want to copy the directory ‘Adam’ with all subdirectories:
aws s3 cp Adam s3://araffe-testbucket/ --recursiveThese are just simple examples - it’s worth checking out the documentation for full details on what you can do with the S3 command line.
Using Pre-Signed URLs
When you upload objects to S3, those objects are private, unless you have configured that to not be the case (which isn’t normally advisable). However, there will be times when you want to make objects available on an exception basis but still keep them private overall. Is that possible? It is, using pre-signed URLs.
A pre-signed URL is a special URL that you create with your own credentials that gives anyone with the URL access to the object in question, on a time-limited basis. Let’s say I want to give someone access to the ‘hello.txt’ file that I uploaded in the last section. To do that, I can use the following CLI command to generate a pre-signed URL for this object:
aws s3 presign s3://araffe-testbucket/hello.txtThis command generates a URL that you can give to the person who needs access to your file - note that by default, this URL expires in 3600 seconds, although you can configure this expiration using the ‘–expires-in’ switch.
S3 Versioning
I have an S3 bucket which I’m using to store a whole bunch of files in. One day, I make a change to one of my files and then re-upload it to my S3 bucket, overwriting the old one. Then - to my horror - I realise that I’ve made a terrible mistake with the updated file and need to go back to the old one. Unfortunately I’ve already overwritten both my local copy and the one in S3, so I’m now in big trouble. If only there was a way to prevent this from happening…
Versioning in S3 allows you to keep multiple versions of the same object within a single S3 bucket. What that means in practice is that you can overwrite an object (like I did in my example), however the object will be created with a new version number, while the old version will remain in place. If I make a mistake, I can restore the previous version of the object and all will be fine with the world. Let’s see how this works.
I’m once again creating an S3 bucket, but this time I am enabling versioning on that bucket (note that you can also enable versioning on previously created buckets):
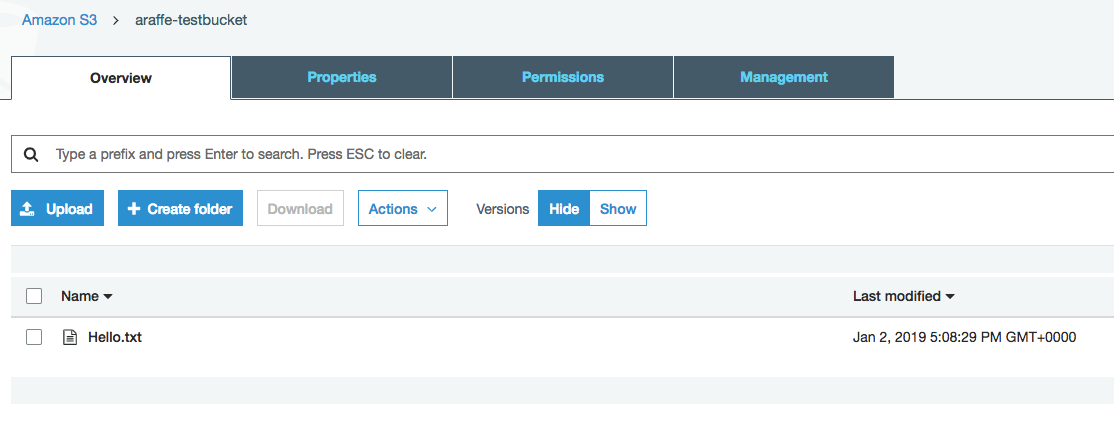
I then upload a file into my new bucket called ‘hello.txt’:
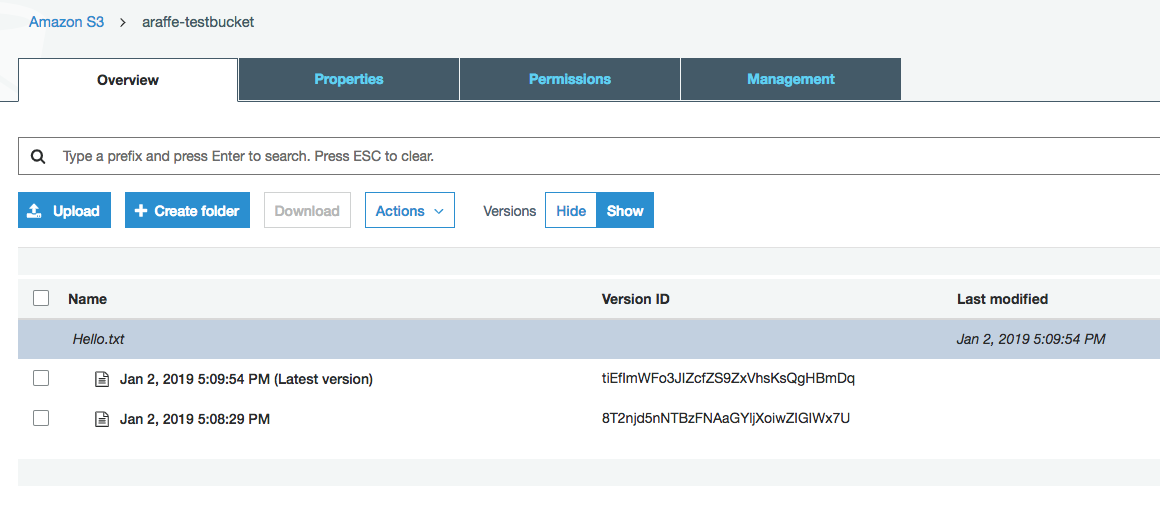
I now make an update to my text file and re-upload it to my bucket. Once I have done this, because versioning is enabled on the bucket, I can see both versions of the file:
I can easily download either of the versions using the normal methods. If I want to, I can delete the latest version of the file, which will result in the older file being left in the bucket and still available for download.
Versioning also affects how objects behave when they are deleted. Deleting an object in a versioning enabled bucket doesn’t actually delete the object at all - instead, a ‘delete marker’ for that object is placed in the bucket. You can see this in the screenshot below, after I have deleted the file ‘hello.txt’:
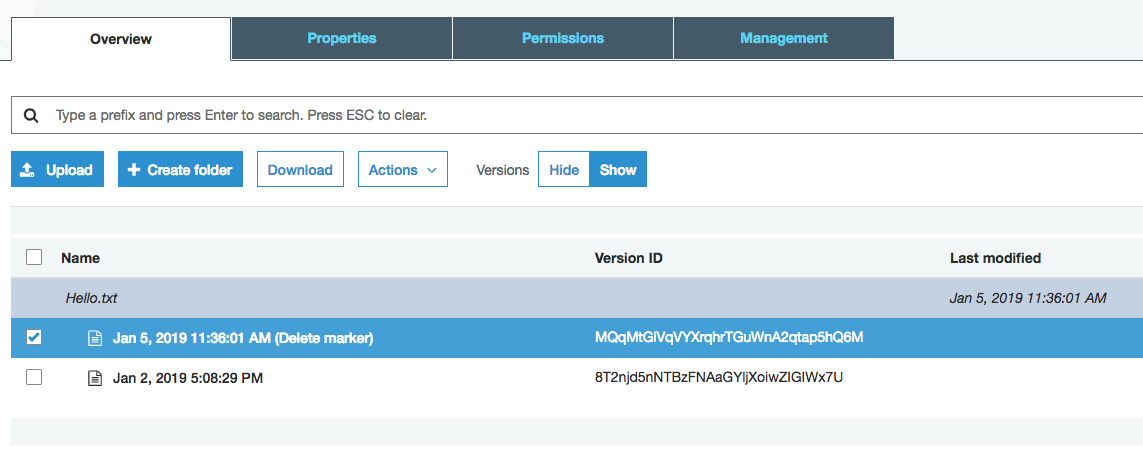
OK, but what if I want to recover my file? Simple: I just remove the delete marker - this restores the original object to the bucket.
One thing to bear in mind when using versioning is the impact it may have on costs. As you are now potentially storing multiple versions of an object in your bucket, these are charged at the normal rates for the tier you are using.
Finally, once versioning is enabled on a bucket, it cannot be disabled - only suspended. Suspending versioning on a bucket means that no new versions of objects will be created, however any existing object versions will be kept.
Lifecycle Management
At the beginning of this post, we discussed the various storage tiers available in S3 (Standard, Standard-IA, Standard-One Zone-IA, and so on). It’s of course perfectly fine in many cases to stick all of your objects into the Standard tier and be done - equally however, you may find that this isn’t the most cost effective strategy for storing your objects and that it’s better to store some objects in the ‘lower’ tiers. The problem is, how do you manage this if you have a huge amount of objects stored in S3? It’s not really feasible to manually move objects around between tiers. This is where the lifecycle management capabilities of S3 come in.
Lifecycle management allows you to specify a set of rules that state that objects are either moved between S3 tiers when certain conditions are met, or that the objects are deleted after reaching a particular expiration time. As an example, you might upload a set of documents that are accessed frequently for the first month, after which they are hardly ever accessed and therefore better suited to one of the infrequent access tiers.
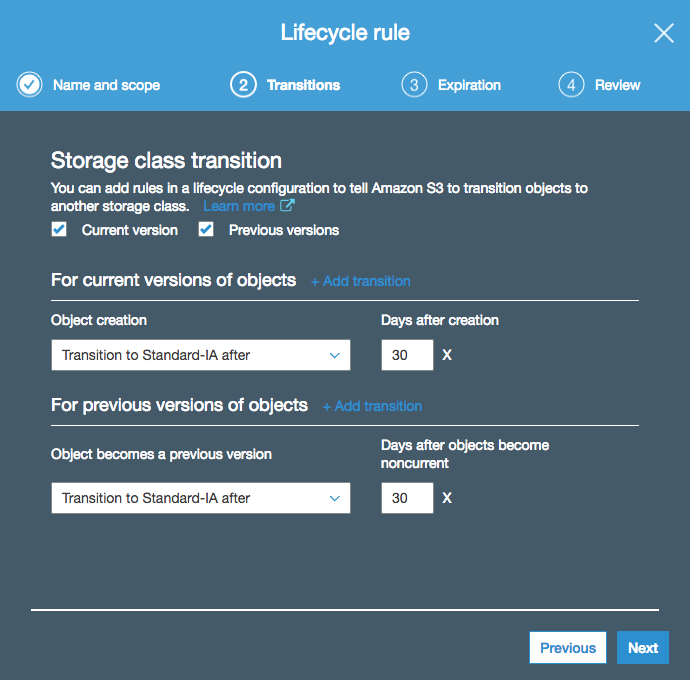
Here’s an example: in the screenshot below, I am creating a lifecycle rule that transitions both current and previous versions of my objects (I have versioning enabled on my bucket) to the Standard-IA tier after 30 days (this is actually the minimum amount of days I can configure for the Standard-IA tier):
On the next page, I am configuring an expiration of 90 days for my objects, including permanent deletion of previous versions:

I could have selected any of the other storage tiers, such as intelligent tiering or S3 Glacier if I wanted to archive my objects after a certain amount of time.
S3 also has a storage class analytics tool which looks at the storage access patterns for your bucket and helps you to decide which lifecycle policies you should configure, which storage class to transition to and so on.
Cross-Region Replication
Under normal circumstances, any objects that you upload to an S3 bucket will stay within the region where that bucket was created - there are obvious reasons for this relating to compliance, etc. You certainly don’t want data to be moved into other regions without your knowledge.
However, there are some situations where you might actually want your data to be copied to another region. For example, where customers reside in multiple geographic locations, you might want to maintain copies of data in two AWS regions that are geographically close to those customers. There might also be legitimate reasons relating to disaster recovery. To support these use cases, AWS provides the ability to perform cross-region replication of objects in S3.
Cross-region replication works exactly as it sounds - any objects uploaded to an S3 bucket after enabling cross-region replication are copied asynchronously to a bucket in another region of your choice. There are a couple of things to bear in mind when enabling cross-region replication:
-
Only objects that you upload after enabling cross-region replication are copied. Any objects that existed before you enabled the feature are not replicated.
-
By default, objects will be replicated using the same S3 storage class as the source object uses. So if your source object is stored in S3 Standard-IA (infrequent access), the replicated object will also be stored in the Standard-IA storage class. You can however specify a different storage class for the replicas should you wish.
-
You can replicate objects between S3 buckets in different AWS accounts.
-
You can replicate encrypted objects, although this is not the default - you have to tell S3 to do it.
Let’s have a look at how this is configured. From the ‘Management’ tab within the S3 bucket, click on ‘Replication’ and the following dialog appears asking you set the source:
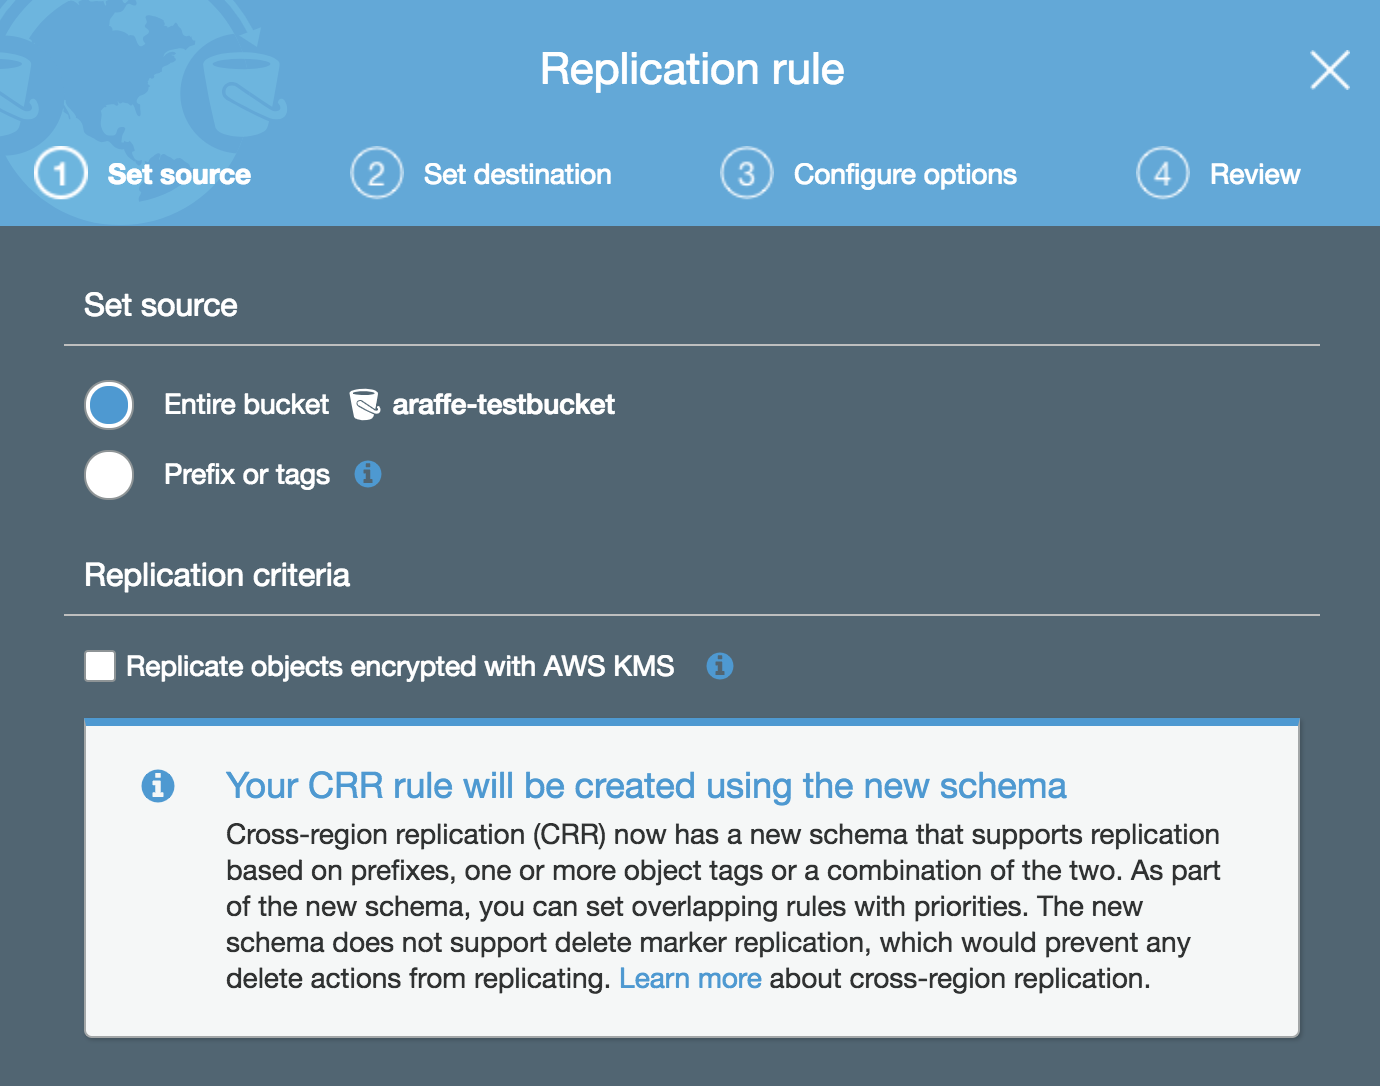
Note here that you can choose to replicate objects in the entire bucket, or you can replicate only objects with a particular tag or prefix (for example, any objects that have a name beginning with ‘photos’).
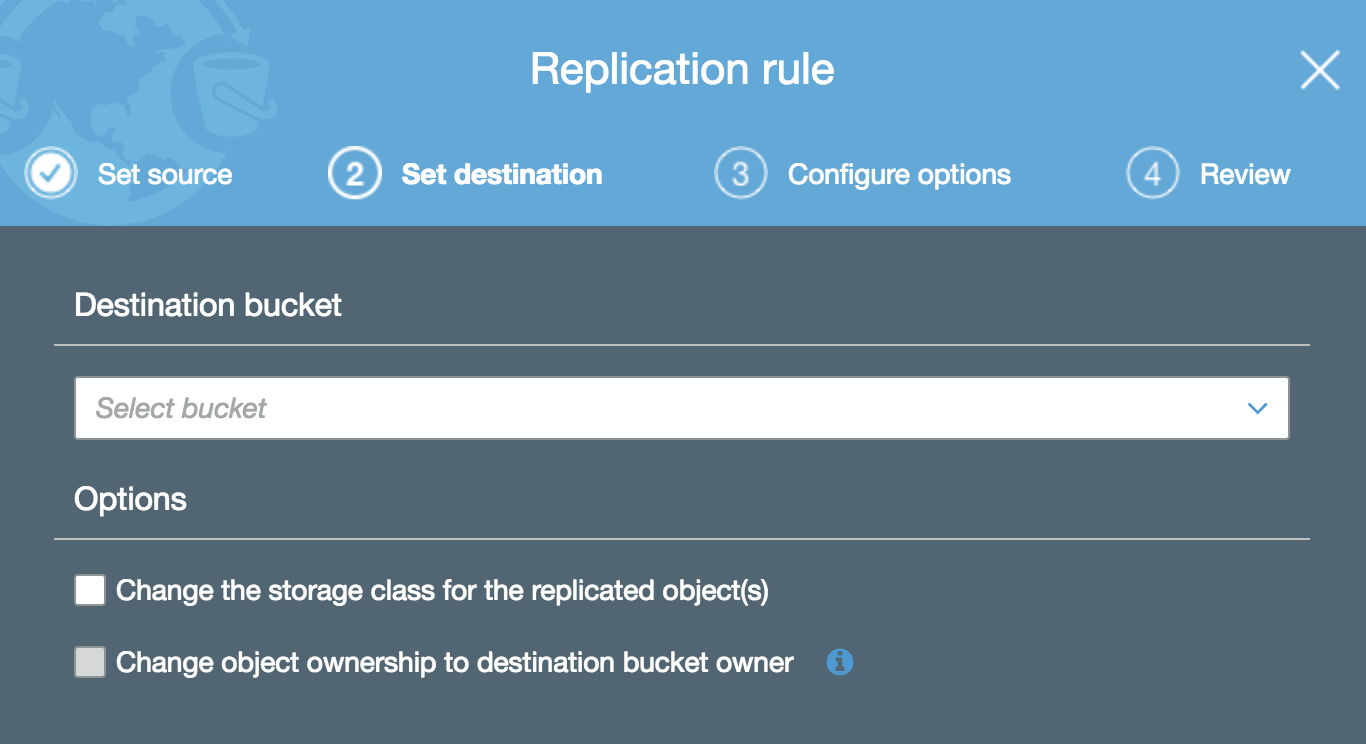
You’re then asked to specify the destination bucket. At this point, you can also change the storage class for replicated objects as well as alter the object ownership:
Note that for cross-region replication to work, you must have versioning enabled (see section above).
Encryption
S3 provides the ability to encrypt the data residing in your buckets at rest. What does ‘at rest’ mean? It is simply the ability to encrypt the data while it resides on disks inside a data centre. The opposite of ‘at rest’ is ‘in transit’, where data is encrypted as it is transmitted from place to place.
As a general rule, you should always choose to encrypt data at rest when you use S3 - there isn’t really a reason not to. When you create the bucket, there is an option to automatically encrypt objects when you upload them to S3 - you should check this box :-) When enabling encryption, you have a number of choices around how the encryption keys are managed:
-
The first option you have is to use Server-side encryption with S3 managed keys (SSE-S3). Choosing this option essentially means that S3 manages the encryption keys for you - you don’t have to worry about any aspect of key management. You simply upload your objects to S3 and each object is encrypted using a unique key.
-
Alternatively, you could go with Server-side encryption with KMS managed keys (SSE-KMS). KMS stands for Key Management Service - this is a service provided by AWS that allows you to create and manage encryption keys. So if you choose this option, your encryption keys will be managed within KMS, rather than directly within S3. What’s the difference? With KMS managed keys, you get some additional benefits over and above SSE-S3, such as the ability to create and manage the encryption keys yourself, as well as audit trails for the master key.
-
Finally, you could choose Server-side encryption with customer managed keys (SSE-C). With this option, you are responsible for managing the encryption keys yourself - Amazon does not store any encryption keys. Instead, you pass the encryption key with the request and S3 uses that to encrypt or decrypt the data. Of course, as Amazon isn’t storing your encryption keys, you need to be careful not to lose them - if you do, you’ve lost your data!
There is one more option not mentioned in the above list - you can of course encrypt the data yourself before you send it to S3. You can do that using either KMS managed keys or keys that you manage yourself - the key point is that S3 is not encrypting or decrypting anything as that is happening on the client side.
That just about rounds things out for S3. There’s more to learn but this post covered the basics and should give you enough info to get going. Thanks for reading!