AWS Fundamentals - Part 7: Networking
20 Feb 2019Networking is an important topic in AWS. Many of the networking concepts in AWS are somewhat similar to what you might find in traditional, on-premises networks - IP addresses, subnets and routing tables don’t just disappear in the cloud! However, there are some differences as well, which I’ll try and cover in this post. Let’s jump in, starting with the most fundamental building block used in AWS networking: Virtual Private Clouds.
Virtual Private Clouds (VPCs)
A Virtual Private Cloud (VPC) is a private, isolated network within the AWS cloud. Within a VPC, you can run the services that you need, including EC2 instances, RDS instances, container clusters and a host of others. The key here is that VPCs are completely dedicated to you - there is no ‘sharing’ of VPCs with other customers or entities (unless you specifically want that to happen), which means you can be safe in the knowledge that services running inside your VPC are isolated from anything else on the AWS cloud, if that is your goal.
Creating a VPC is easy - you need to name it and give it an IP address space (CIDR block):
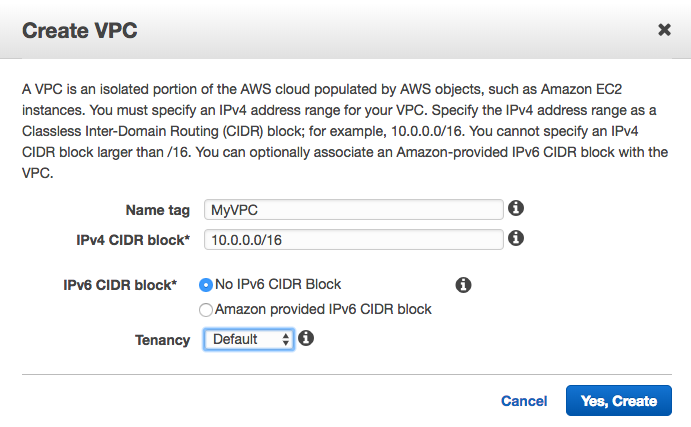
In fact, you don’t even need to create a VPC yourself if you just want to deploy a few services quickly and easily - AWS helps you out by providing a default VPC with every account. This default VPC has a couple of settings that custom VPCs do not - specifically, any instances launched within the default VPC will have a public IP address automatically assigned and will have Internet access directly from that VPC. Custom VPCs do not have this behaviour by default, although it can be easily changed. More on public IPs and Internet Gateways later. The default VPC is configured with a CIDR block of 172.31.0.0/16 and has 3 subnets configured, one per AZ. Each of these subnets has a /20 IP range. Speaking of subnets…
Subnets
To deploy services into a VPC, you are going to need at least one subnet. Each subnet has a specific IP address range (taken from the main VPC CIDR block), so for example, the default VPC (as mentioned above) has a CIDR block of 172.31.0.0/16, with the first subnet using 172.31.0.0/20, the second subnet using 172.31.16.0/20 and so on. Obviously if you decide to create your own VPC, then you can address this as you like.
Now here’s an interesting thing about subnets: they are directly associated with Availability Zones (AZs). When you create a subnet, you need to choose which AZ that subnet is associated with (or you can let the AWS platform choose for you if you don’t care too much). So, with a single VPC and two subnets, our topology might look something like this:

It’s important to understand that a subnet cannot span AZs - it always sits entirely within a single AZ.
Public and Private Subnets
A subnet can be configured either as public or private within the AWS cloud - in other words, it can allow direct access to the Internet, or it can remain inaccessible to the outside world, unless you have another means of getting to it (via a Direct Connect link or VPN connection for example). But what do we actually configure to cause a subnet to be either public or private? It comes down to a combination of a couple of things: an Internet Gateway (IGW) and accompanying route table that routes traffic through that IGW. This is best explained with a diagram:
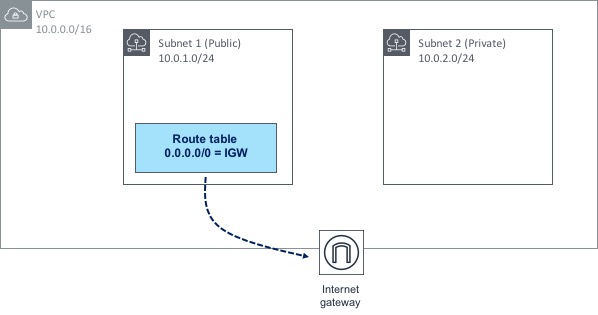
Let’s look first at the Internet Gateway. The IGW is deployed and attached to the VPC itself - not to any particular subnet. However, any subnet has the ability to route through that IGW, which is exactly what Subnet 1 is doing. A route table has been created and attached to Subnet 1. Within that route table, there is a route towards 0.0.0.0/0 (this is known as a default route, as it essentially means “any traffic that doesn’t match any other routes should use this one”). The default route in this case points to the IGW as a next hop - this causes any traffic destined for the Internet to take the path towards the IGW, which is what makes Subnet 1 a “public” subnet.
Now if you look at Subnet 2, there is no such route table pointing towards the IGW, which means there is no possible path that traffic can take out to the Internet - in other words, Subnet 2 is considered “private”.
But simply making a subnet public doesn’t necessarily mean that traffic from its associated instances can automatically reach the Internet - for that to happen, we also need to consider the IP addressing within the subnet.
Public IP Addresses
When you create an EC2 instance and attach it to a subnet & VPC, that instance will automatically receive a private IP address to allow it to communicate with other instances and services internally (or even to on-premises environments via a Direct Connect link or VPN connection). However, a public IP address will allow the instance to communicate out to - and be accessible from - the Internet.
There are two types of public IP address. The first is a dynamically assigned public IP - this type of address is assigned to an instance from Amazon’s pool of public IPs. That address is not “owned” by you and it isn’t associated with your account - think of it as if you are “borrowing” the address from AWS.
Now, there’s an important point to remember about public IP addresses: if you either stop or terminate the instance, the public IP address that is attached to that instance is released back into the pool. What that means in practice is that if you restart the instance, you are extremely unlikely to end up with the same public IP address you had previously. Is that an issue? Maybe, maybe not. In many cases, having a public IP address that could change won’t be a problem (e.g. if you are relying on DNS resolution), but what about if an application is hard coded to use a specific IP address, or if there is some kind of firewall rule in place that allows only a specific IP? In that case, you might want to look at Elastic IPs instead.
Elastic IPs
An Elastic IP (EIP) is a public IP address that is associated with your AWS account and which you can assign to any of your instances. Because the EIP is associated only with your account, no other user of AWS will be able to use that address - it’s yours until you decide to “release” it, at which point it will go back into the pool.
Elastic IPs solve the problems mentioned above - i.e. whitelisting / firewall rules, hard coding of addresses inside applications, etc.
As of late 2018, it’s now even possible to bring your own address pool to your AWS account (as long as you can verify that you own it) and allocate Elastic IPs from that - this is known as Bring Your Own IP.
Let’s take a closer look at how public IPs work with EC2 instances. I have an instance running Amazon Linux - this instance has been assigned a public IP address of 35.178.187.67:
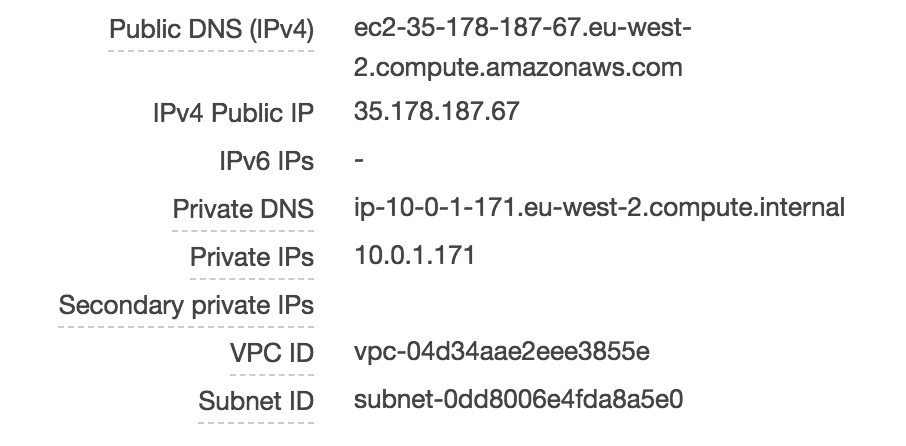
If I log on to my instance using SSH and execute an ‘ifconfig’ to view the IP addresses, it seems logical that we would see that public IP address listed in the output:
ec2-user@ip-10-0-1-171 ~]$ ifconfig
eth0: flags=4163<UP,BROADCAST,RUNNING,MULTICAST> mtu 9001
inet 10.0.1.171 netmask 255.255.255.0 broadcast 10.0.1.255
inet6 fe80::49b:50ff:fed3:55fa prefixlen 64 scopeid 0x20<link>
ether 06:9b:50:d3:55:fa txqueuelen 1000 (Ethernet)
RX packets 22325 bytes 30020597 (28.6 MiB)
RX errors 0 dropped 0 overruns 0 frame 0
TX packets 3829 bytes 435543 (425.3 KiB)
TX errors 0 dropped 0 overruns 0 carrier 0 collisions 0

lo: flags=73<UP,LOOPBACK,RUNNING> mtu 65536
inet 127.0.0.1 netmask 255.0.0.0
inet6 ::1 prefixlen 128 scopeid 0x10<host>
loop txqueuelen 1000 (Local Loopback)
RX packets 0 bytes 0 (0.0 B)
RX errors 0 dropped 0 overruns 0 frame 0
TX packets 0 bytes 0 (0.0 B)
TX errors 0 dropped 0 overruns 0 carrier 0 collisions 0
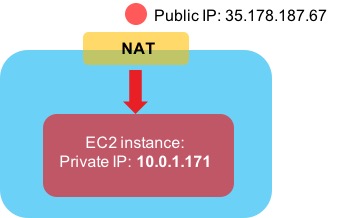
Hmm….we can see the private IP address here (10.0.1.171), but the public IP address is nowhere to be seen. How can that be? It turns out that AWS is doing Network Address Translation (NAT) behind the scenes. If traffic comes in from the Internet destined for the public IP address of your EC2 instance, AWS translates the destination address from the public IP to the private IP to allow it to reach the instance:
Alright, enough about IP addresses - time to look at how routing works in AWS networking.
Routing
In order to control how traffic flows in and out of the environments you create, every subnet is associated with a route table. A route table contains - believe it or not - one or more routes to control the flow of traffic. We’ve already seen earlier on that a default route (0.0.0.0/0) is often in place to direct traffic towards the Internet (via an Internet Gateway), but this isn’t the only type of route we can have. A route might point to a different type of gateway, such as a VPN gateway, a peering connection or VPC endpoint (we’ll look at these later).
When you create a VPC, a special type of route table called the Main Route Table also gets created. If a subnet does not have an explicit association with a particular route table, then all routing for that subnet will be controlled by the main route table. However, it’s also possible to create a custom route table and assign that directly to your subnet(s) instead. Let’s look at a diagram to show how this works:
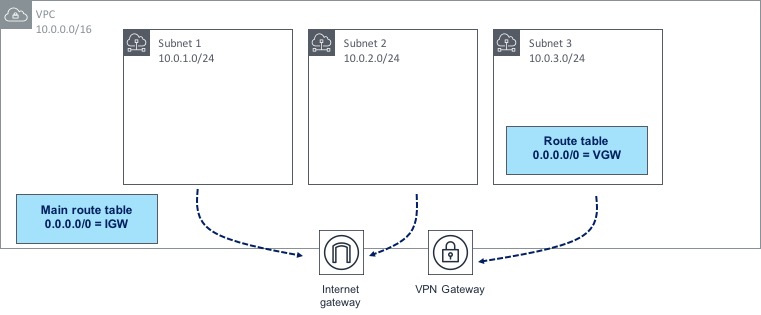
In the diagram above, we have three subnets within a VPC; two of those subnets are not explicitly associated with a route table, therefore they will use the main route table, which happens to have a route to the Internet through an IGW. Subnet 3 however has its own custom route table associated with it, which has a different 0.0.0.0/0 route towards a VPN gateway. By building and associating route tables in this way, you have a lot of control over how traffic is routed to and from your AWS environment.
NAT Gateways
Let’s say I have some EC2 instances sitting within a subnet. I don’t want those instances to be directly accessible from the Internet (i.e. no-one should be able to SSH in or send an HTTP request to any of my instances). However, I do need those instances to be able to connect out to the Internet so they can pick up patches, updates and so on. This presents a problem - if I give each of my instances a public IP address, that means they can connect out to the Internet (great), but it also means that someone from the outside could easily connect in to my instances (not so great).
Fortunately, this problem is solved by a feature of AWS networking called NAT Gateways (or Network Address Translation Gateways). The idea behind a NAT Gateway is that it allows EC2 instances within a private subnet (i.e. one that does not have a route to an IGW) to access the Internet through the gateway, but it does not allow hosts on the Internet to connect inbound into those instances. As ever, a diagram will help to explain how this works:
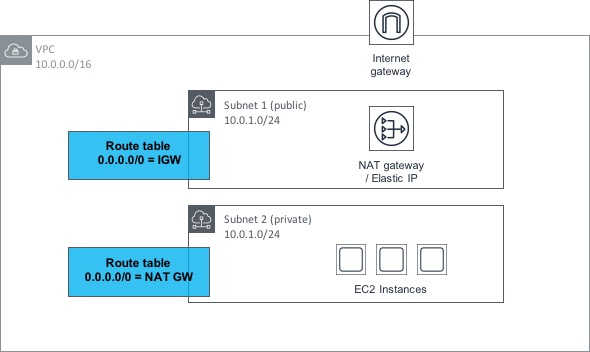
OK, let’s step through this bit by bit. Within the VPC shown above, we have two subnets; one is public (i.e. it has a route to an Internet GW or IGW) and the other is private (it has no such route to an IGW). The private subnet has a number of EC2 instances contained within, all of which need outbound access to the Internet.
The public subnet has a NAT Gateway provisioned within it - this NAT Gateway also has an Elastic IP address associated with it. We discussed Elastic IPs earlier in the post - there is no real difference here, apart from the fact that the EIP is associated with the NAT Gateway rather than an EC2 instance. As the public subnet (in which the NAT Gateway resides) has a route to the IGW, the NAT Gateway can therefore reach the Internet.
Now, if we look at the private subnet, we can see that it has a route table associated with it that contains a default (0.0.0.0/0) route towards the NAT Gateway in the public subnet. This means that if the EC2 instances make a request outbound to the Internet, the request gets routed through the NAT Gateway and out to the Internet through the public subnet. However, there is no possible method for connections to be made inbound from the Internet to the EC2 instances.
Load Balancing
Load balancing is nothing new - it’s been around for many years in many types of environment. Load balancing gives you the ability to distribute traffic across similarly configured instances or other types of service. If for example, you have a web server farm consisting of a number of virtual machines / instances, load balancing will allow you to distribute traffic across these instances in a relatively even manner. Load balancing also allows you to make more intelligent decisions about where to send that traffic (for example, the failure of a single instance should mean that instance is removed from the farm of machines that the load balancer is sending traffic to, typically based on some kind of ‘health check’ functionality).
In AWS, there are few different types of load balancer available, as follows:
-
Classic Load Balancer: This is the original load balancer available from AWS - it is now considered a ‘previous generation’ load balancer and although it is still in widespread use, users should be encouraged to use one of the new generation load balancers (see below) instead.
-
Network Load Balancer: The NLB functions at layer 4 of the Open Systems Interconnection (OSI) model. This means that it load balances traffic based primarily on information at the TCP layer - although as of January 2019, it does now also support SSL / TLS termination.
-
Application Load Balancer: The ALB works at layer 7 of the OSI model (or the application layer). This means that it can be used for more advanced functionality, such as SSL / TLS termination, host or path based routing as well as support for multiple applications running on the same EC2 instance.
As the Classic load balancer is now considered ‘legacy’, I’ll focus on the NLB / ALB here. Have a look at this simple example:

In this diagram, we have a Network Load Balancer (i.e. one that operates at layer 4). There are a couple of components involved with setting up a load balancer:
-
A Listener - this is essentially a rule that says ‘look at connection requests from clients on this specific port’. This rule then says ‘forward this request to one or more target groups’.
-
Target Group - the target group is a list of targets, such as EC2 instances or IP addresses that the requests will be forwarded to.
So in our example, we have a listener set up to look at requests on TCP port 80 and then forward those requests to a target group called Web, which contains three instances. As long the three instances are healthy, requests will be forwarded to them.
Note that the concept of listeners and target groups is common to both NLBs and ALBs.
One other thing to also mention is that load balancers can operate as either internal or Internet facing - load balancers that are designated as internal are for use by other hosts and devices within an AWS VPC and will not be accessible by clients on the Internet.
Finally, load balancers are availability zone (AZ) aware, so instances can be distributed across AZs and the load balancer will deliver traffic to them.
Security Groups
How do we secure access to and from the resources that we provision in AWS? Security Groups are used to lock down access into and out of your instances. A security group is essentially an access control list containing a set of rules that dictates which ports, protocols and IP ranges are allowed through to your resources. Here’s an example:
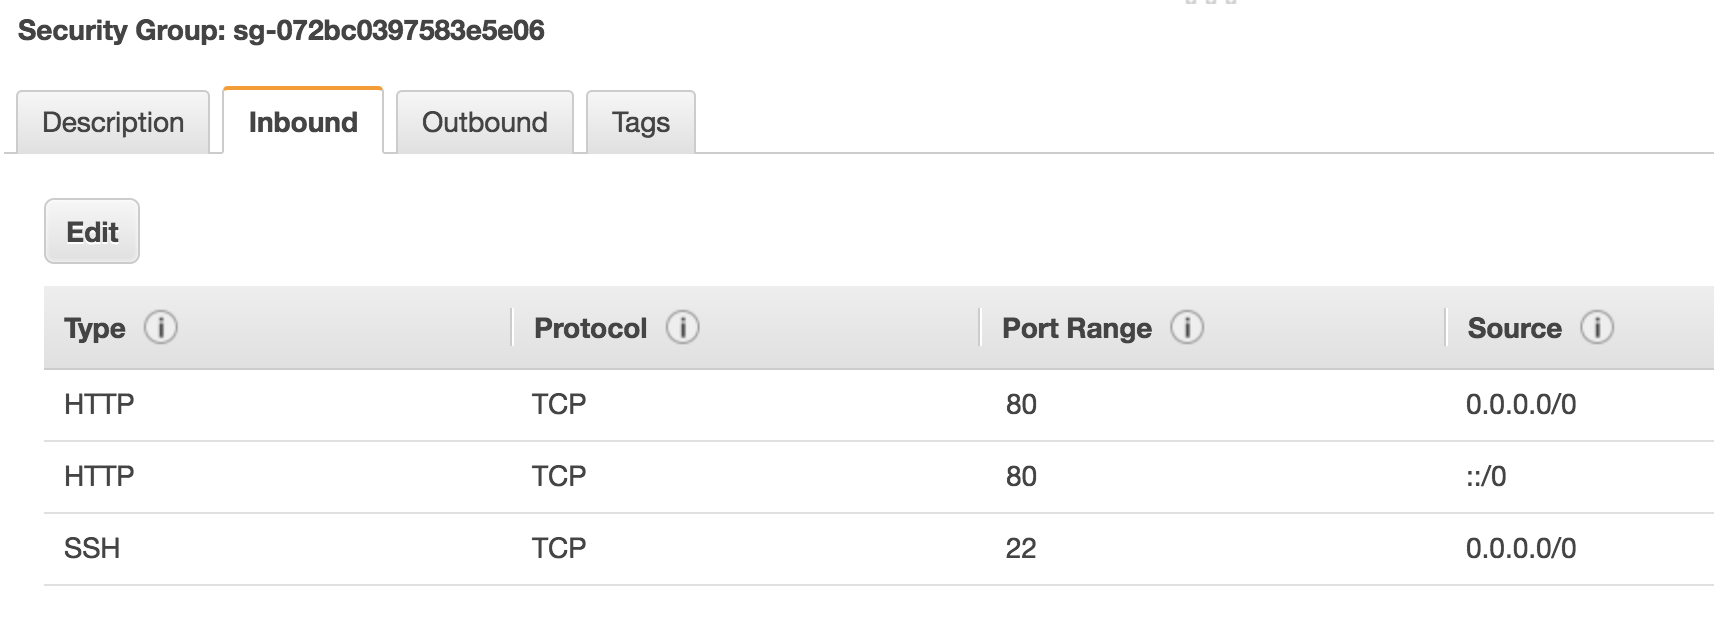
In this simple example, I’ve configured the security group to allow HTTP and SSH access from any source (0.0.0.0/0). In reality, you would ideally lock this down to specific IP addresses rather than allowing SSH from the entire Internet, but you get the idea.
One important point about security groups is that they are stateful. To understand what that means, think about an entry in a security group that allows traffic outbound from an EC2 instance. What about the return traffic back to that instance - is that allowed or denied? Because the security group is stateful, it automatically allows the return traffic back in - you don’t have to configure an entry yourself to allow that traffic.
VPC Peering
OK, so you’ve deployed a couple of VPCs - perhaps you have a different application deployed into each one, or maybe you have just split the app up and deployed it across multiple VPCs for more control. Now though, you’ve realised that actually there does need to be some communication between the VPCs you’ve deployed. Can it be done? Maybe you’ll have to route traffic from one VPC out to the Internet and back in to the other VPC? Well, that’s not going to be necessary, because there is a simple way to do this - VPC Peering.
VPC peering does exactly what you’d expect it to do - it allows you to peer two VPCs together in order for traffic to flow between them. The two VPCs could both be in the same AWS account, or they could be in two different accounts. You can even peer VPCs that reside in different AWS regions.
In order for VPC Peering to work, there are two main things you need to do:
-
Set up the peering connection itself
-
Set up routes that point to the ‘opposite’ VPC via the peering connection.
Here’s an example:

In the above diagram, a VPC Peering connection has been set up between VPC A and VPC B. VPC Peerings are always named pcx- followed by a number, so in this case our connection is called pcx-11112222. In order to set this connection up, one side creates a request. To activate the VPC Peering, the request must be accepted by the other side (i.e. the owner of the other VPC). But just having the peering in place doesn’t mean traffic will flow between the VPCs. To allow communication, a route is needed within each VPC that points to the address range of the opposite VPC and routes via the pcx-xxxxxxxx connection.
There are a couple of restrictions to be aware of with VPC Peerings. Firstly, it won’t work if you have overlapping CIDR ranges within the VPCs. So for example, if both VPCs you wish to connect have a CIDR range of 172.168.0.0/16, the peering won’t work.
The second restriction on VPC Peerings is that they are non-transitive. What does that mean? Let’s say you have three VPCs - A, B and C. VPCs A and B are peered together, as are VPCs B and C. You might think that you will be able to communicate between hosts in VPC A and C - through VPC B - but this is not the case:
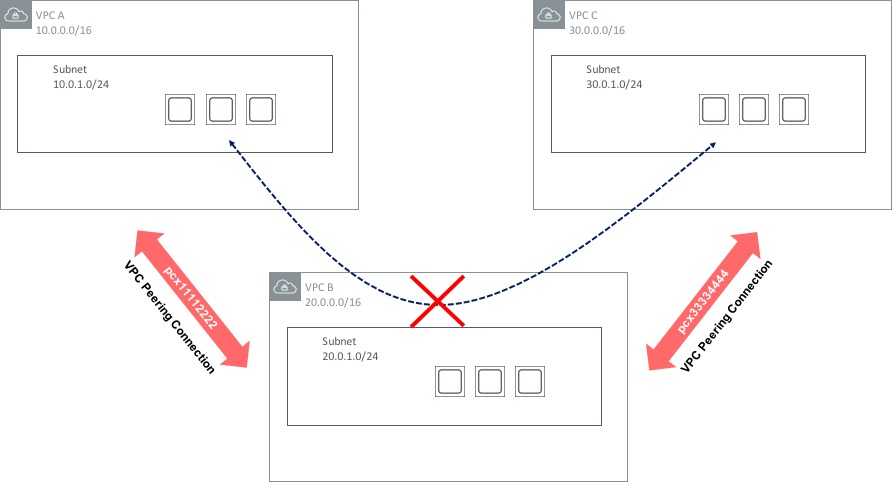
There are some ways around this - the Transit VPC design has been around for some time and uses a 3rd party network appliance (such as a Cisco CSR router running in the cloud) to provide ‘hub and spoke’ type routing between multiple VPCs. This design does have a few limitations however (such as limited bandwidth compared to VPC Peering), so this design pattern is likely to be superseded in many cases by a feature called Transit Gateway, which was announced at re:Invent 2018. Transit Gateway is a major step forward in the area of VPC connectivity, so let’s take a look at how it works.
Transit Gateway
Let’s start by looking at an environment with three VPCs. Each of those VPCs is used for a specific function, but there is also a requirement to provide ‘any to any’ connectivity between the three VPCs. We can use VPC peering to achieve this - the resulting topology would look something like this:
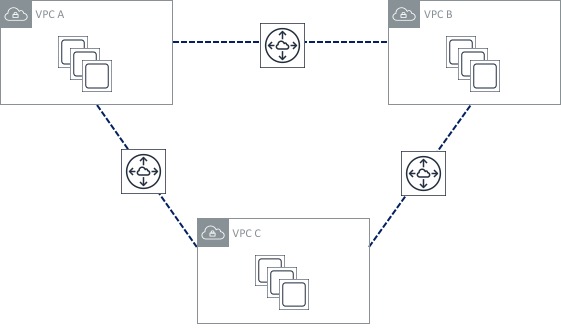
Not too bad, right? Three VPC peering connections isn’t too much to manage. Now though, I’ve decided to add two more VPCs to my environment. What does my peering topology look like now?
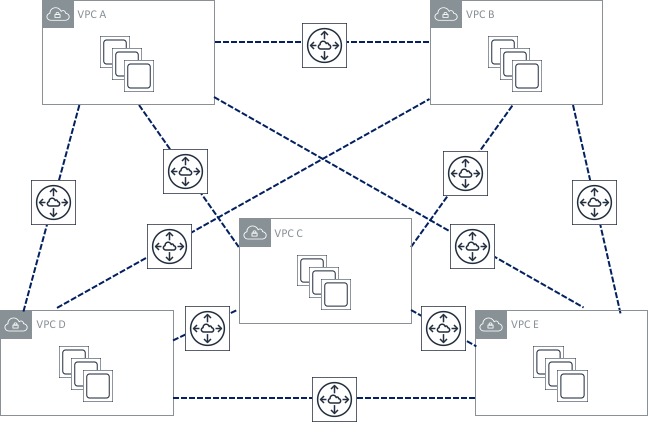
Oh dear! The number of peerings I have has increased significantly, which looks much more difficult to manage. Obviously this problem is going to get worse as I add more VPCs to my environment. The other issue here is that it becomes difficult to scale - there are limits on resources such as VPC peerings and routes that will probably prevent me from scaling this environment significantly. Previously, I could get around this by using the “transit VPC” design I mentioned in the section above, but that has its own limitations and drawbacks.
Transit Gateway solves this issue by creating a central point of attachment for VPCs and on-premises data centres via VPN or (later on) Direct Connect. With Transit Gateway in place, my topology now looks like this:
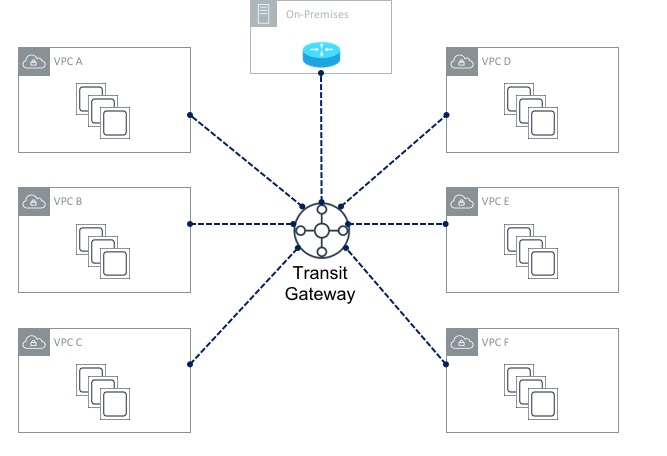
The Transit Gateway (or TGW for short) essentially acts like a large router to which your VPCs can all attach. The first thing you need to do is create the TGW itself. Once that’s done, you create Transit Gateway Attachments - each attachment connects a VPC to the TGW. By default, routing information will be propagated from each of the VPCs into the TGW routing table. This means that the TGW will have the information needed to reach the VPCs. However the reverse is not true - so each VPC needs to have routing information populated manually. For example, let’s say VPC A uses a CIDR range of 10.1.0.0/16 and VPC B uses a CIDR range of 10.2.0.0/16 as shown here:
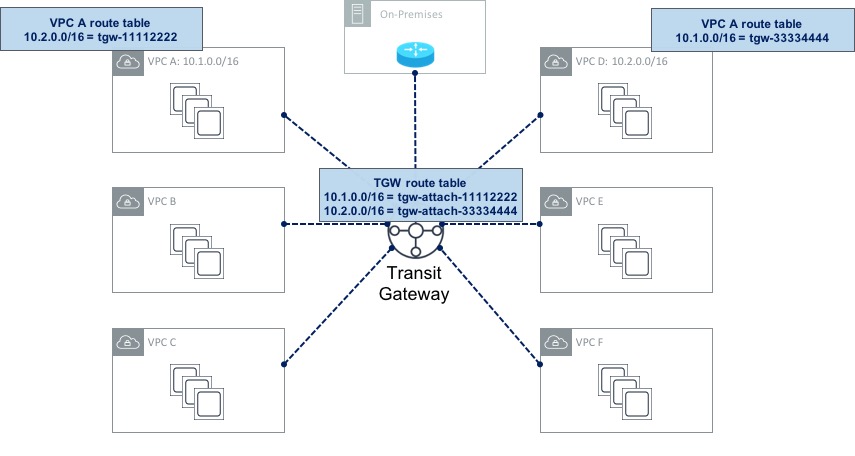
In this example, the TGW route table has routes for both VPC A and VPC B (it may also have routes for the rest of the VPCs, but I’ve not shown those to save space). These routes have been propagated (i.e. they didn’t have to be configured manually). Now if you look at the route table for VPC A, you can see that it has a route pointing to VPC B via the TGW. This route had to be configured manually (it was not propagated). The same goes for VPC B.
Also shown in the above diagrams is a connection to an on-premises data centre. Before Transit Gateway was available, configuring VPN connections in a multi-VPC setup was sometimes difficult - it was necessary to configure a VPN Gateway (VGW) for each of the VPCs you had in place. With a Transit Gateway, you can configure a single VPN connection from the TGW to your on-premises data centre which can be shared by each of the attached VPCs. You can even configure multiple VPN connections from the TGW and traffic will be distributed over them to provide higher bandwidth (using equal cost multi-pathing).
Finally, it’s also possible to configure multiple route tables on a Transit Gateway in order to provide a level of separation in the network. This is very similar to the VRF (Virtual Routing & Forwarding) capability that most traditional routers have. As an example, you could connect each of the six VPCs shown above to a single TGW, but specify that VPCs A and B used the first route table (thereby allowing connectivity between them), while the rest of the VPCs use a completely separate route table. VPCs A and B would essentially be in their own network environment, while VPCs C, D, E and F would reside in a completely independent, isolated network with no connectivity to VPCs A and B.
PrivateLink & VPC Endpoints
Think about a regular VPC with some EC2 instances residing within. Then imagine that those EC2 instances require connectivity to one or more AWS services (CloudWatch, SNS, etc) - for example, the EC2 instance might need to download some files from S3. What path does that traffic take? Under normal circumstances, that traffic will take the path over the public Internet; remember, S3, CloudWatch and other services are public services, which means that they are accessible via the Internet, or Direct Connect public VIF, etc.
This however might be a problem for some organisations - having their traffic leave the AWS network and on to the public Internet might not be all that appealing for some security conscious customers. VPC Endpoints and PrivateLink are designed to alleviate these concerns by allowing users to create private connections between their VPCs and AWS services, without the need for Internet Gateways, NAT and so on.
Here’s how it works.
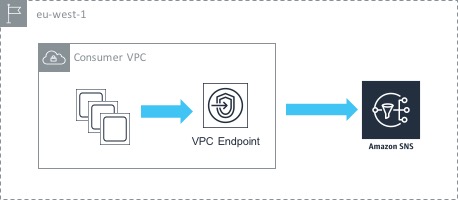
In the above example, we have a single VPC containing a number of EC2 instances. Those instances want to access the AWS SNS service privately (i.e. not via the Internet). To achieve this, we create an interface endpoint inside our VPC that points towards the SNS service. What this actually does is creates a network interface (ENI) inside our VPC with a private IP address. That means that our EC2 instances are able to access the SNS service using the private IP inside the VPC, which results in the traffic never leaving the AWS network. You also have the option of creating an ENI in multiple subnets / availability zones for high availability.
One thing to be aware of is that there are a couple of services - S3 and Dynamo DB - that work in a slightly different way. These services use something called gateway endpoints - instead of creating an ENI inside the ‘consumer’ VPC, a gateway endpoint provides a target that you can route to. So in this case, you need to add a route to your routing table to S3 via the gateway endpoint.
VPC endpoints are a great feature, but there’s even better news - it’s also possible to create endpoints that point to your own services - i.e, not just the AWS services that we all know and love. Let’s look at an example.

Here, we have two VPCs - one acts as the ‘consumer’ (i.e. it contains instances that will connect to the service) and the other is the ‘provider’ (it contains the service that we want to give our consumers access to. In order to set this up, we first need to configure a Network Load Balancer in front of our service in the provider VPC. This will load balance traffic across the instances that make up our service. Now that we have that in place, the next thing to do is to create an Endpoint Service. The Endpoint Service makes your service available to other VPCs through an endpoint.
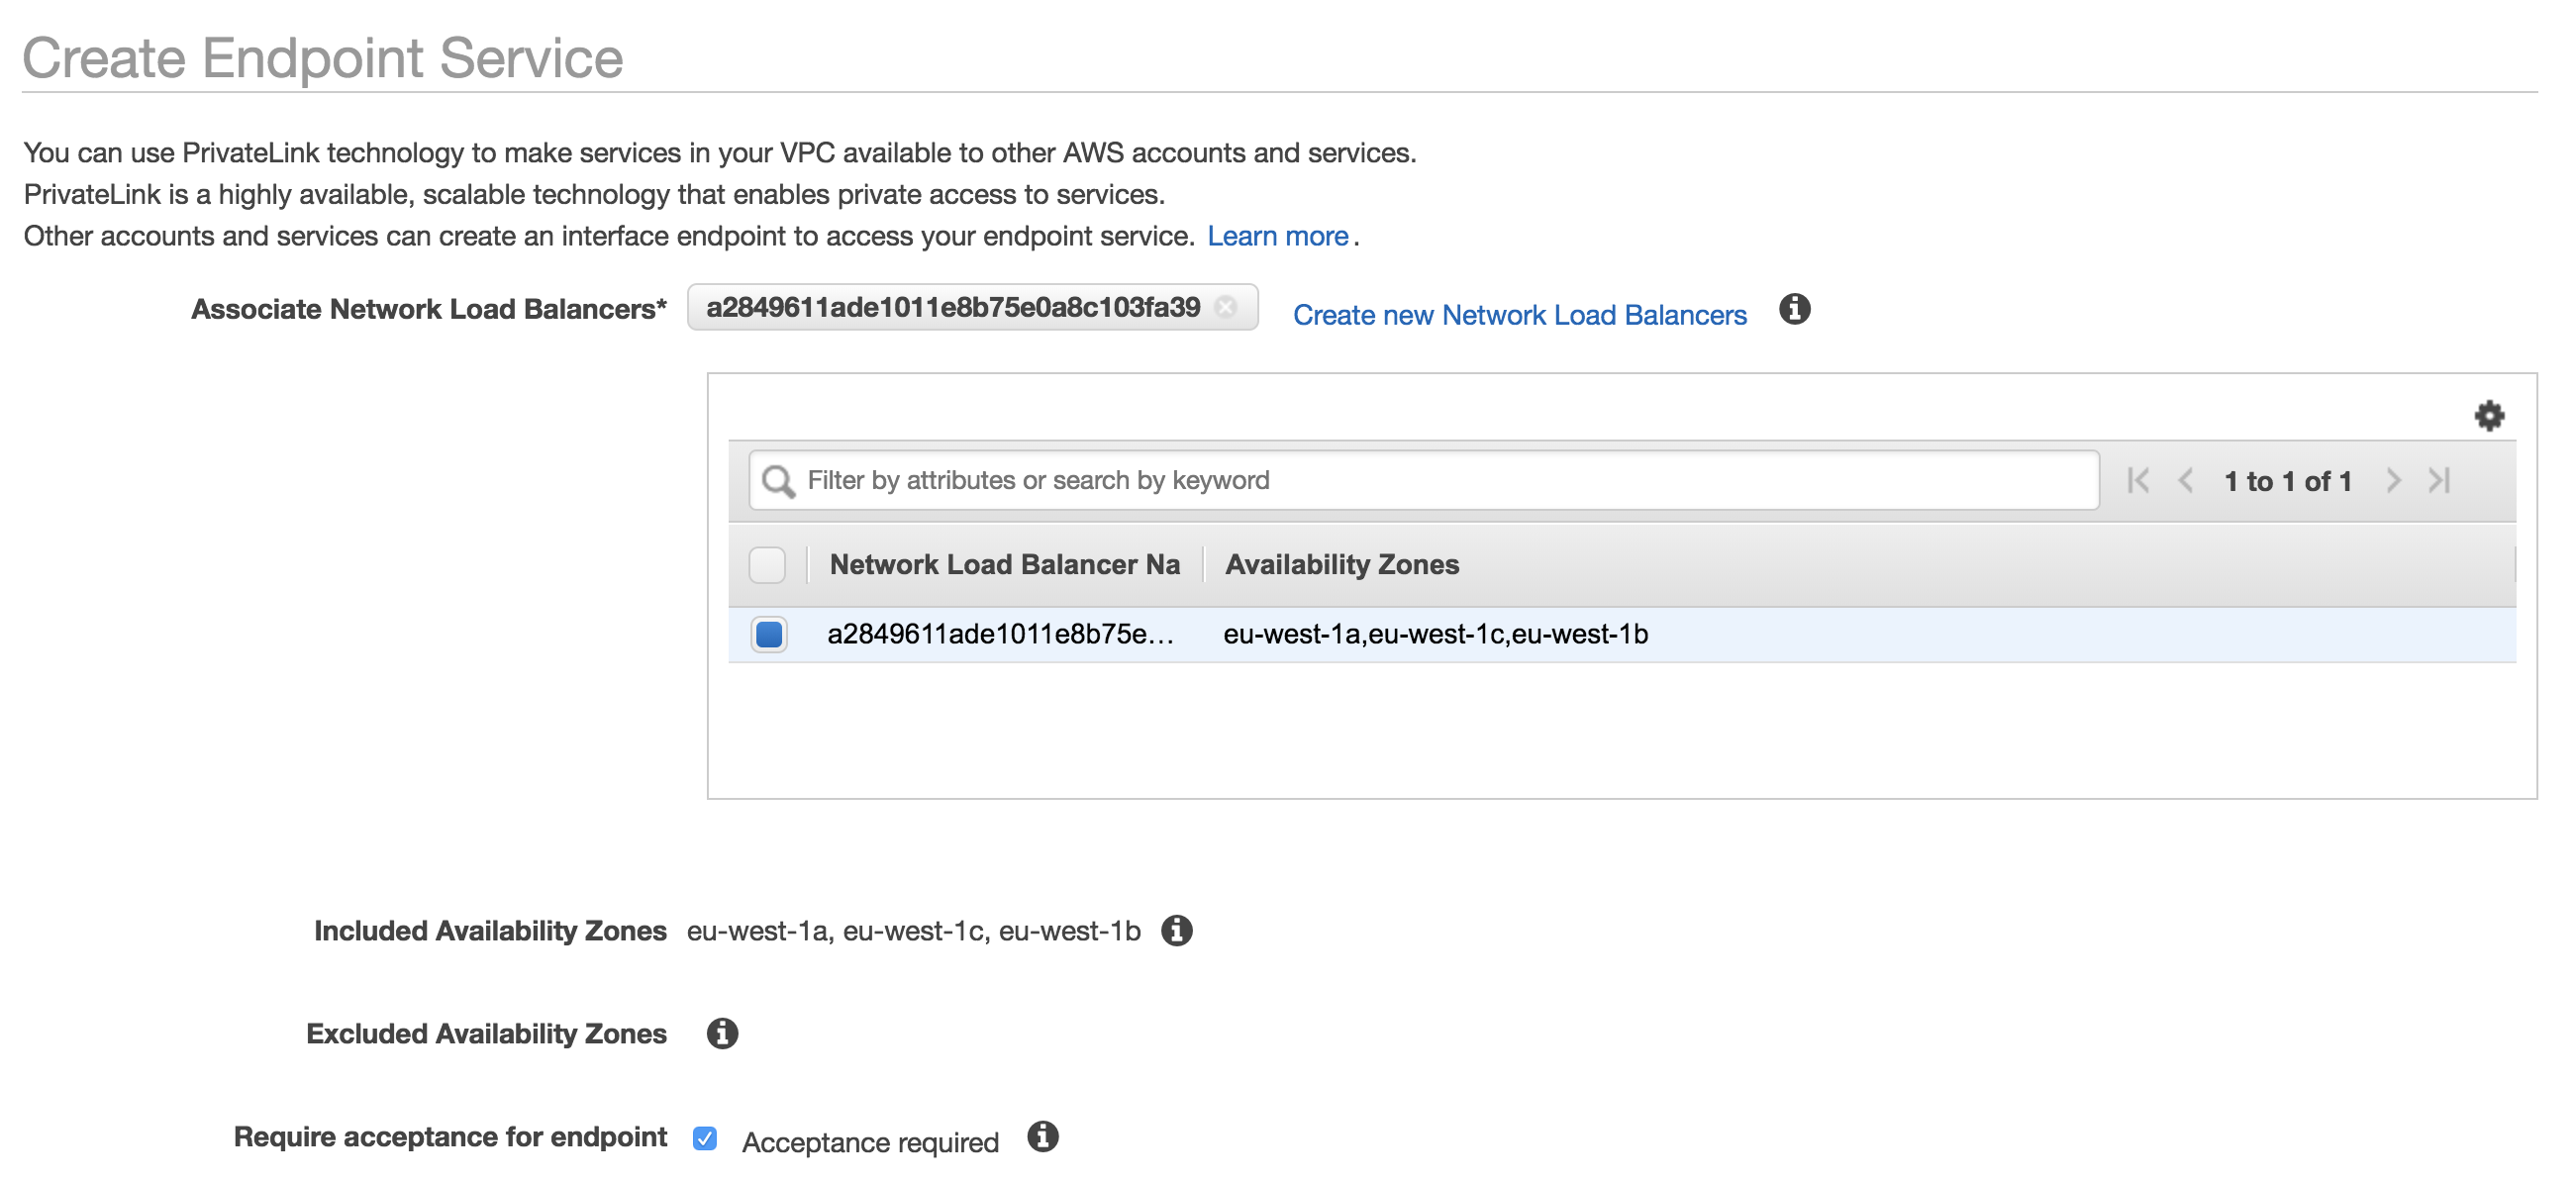
Finally, we create an endpoint (similar to what we did in the AWS service use case) that points to the Endpoint Service that we just created. This enables private communication between the instances in the consumer VPC and the service that sits in the provider VPC.
Some might ask at this point: why not just enable VPC peering between the two VPCs? That would certainly be an option - the difference is that VPC peering enables full network connectivity between the two VPCs, while VPC Endpoints enable connectivity between services. In other words, with VPC peering, you are enabling fairly broad access, while with Endpoints you are allowing only specific connectivity between the services that you want.
Direct Connect
The ‘default’ method of connectivity into the AWS cloud environment is the Internet. This works just fine for many people, but equally, there are organisations who need to be sure that traffic to and from AWS is ‘private’ (i.e. not traversing the Internet). To satisfy this requirement, there are two main options: VPN connectivity (covered later in this post) and AWS Direct Connect.
Direct Connect is a private, dedicated line between AWS and a customer’s on-premises environment - Direct Connect provides a high bandwidth connection with predictable latency. 1Gbps and 10Gbps options are available, with lower connection speeds (50Mbps, 100Mbps, etc) available from AWS partners offering Direct Connect services.
A customer connects to AWS via Direct Connect at one of the available locations (more details here). It’s also possible to extend connectivity from a Direct Connection location to a customer’s location - this can be done with the help of an AWS partner.
Resources that you access inside AWS can generally fall into two categories; those resources that live inside a VPC (e.g. EC2 instances) and those that sit outside a VPC (S3, for example). Direct Connect can be used to provide connectivity to both types of resource, but it does need to be configured to do so. This is achieved through the use of virtual interfaces, or VIFs:

As you can see in the diagram above, a private VIF should be configured for connectivity into a VPC, whereas a public VIF needs to be configured for connectivity into services with a public end point (such as S3, RDS, ECS, etc).
In order for traffic to flow across a Direct Connect circuit, the correct routing information needs to be present at both the AWS and customer ends. To achieve this, the Border Gateway Protocol (BGP) is used - BGP is a widely supported routing protocol on most customer routers. From the AWS end, VPC CIDR ranges and / or public IP prefixes are advertised using BGP to the customer’s router. From the customer end, customer routes (or a default route) can be advertised to AWS.
Virtual Private Network (VPN) Connections
The other option for providing ‘private’ connectivity between an on-premises environment and AWS is to use a Managed VPN Connection. A VPN connection allows the user to configure a private secure tunnel using IPSec, typically over the public Internet. VPN connections are limited to 1.25Gbps, so don’t provide the same level of performance as a Direct Connect circuit.
VPN connections use two main components for the configuration: a Virtual Private Gateway and a Customer Gateway. The Virtual Private Gateway (or VGW for short) is the termination point for the VPN connection within a VPC. A VGW has a BGP Autonomous System (AS) number associated with it - this can be an AWS assigned number, or a customer number that you choose. The Customer Gateway is a resource that represents the customer side of the VPN connection (e.g. the “on-premises” side). When you configure a Customer Gateway, you specify the IP address of the VPN router within the on-premises environment, as well as the AS number of the on-premises side if using dynamic routing.
VPN Redundancy
One thing to bear in mind when setting up VPN connections is that each connection uses two tunnels for redundancy purposes. This ensures that connectivity remains should an underlying issue affect one of the VGWs. However, having two tunnels doesn’t provide protection against the failure of the customer gateway (as both tunnels terminate on the same CG). To protect against the failure of a single Customer Gateway, it’s possible to set up a separate VPN connection and terminate this on a different CG at the on-premises end.
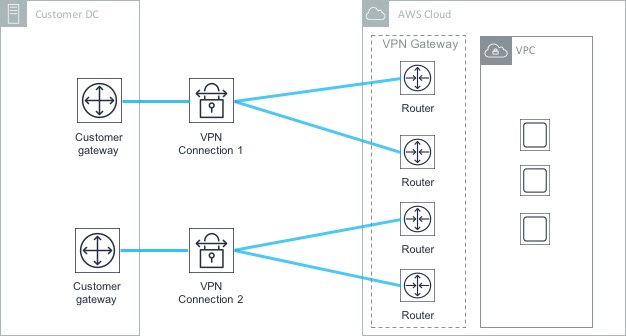
In the above diagram, there are four tunnels in total - two associated with the first Customer Gateway and another two associated with the second. In this scenario, if the first CG fails, the second is still available to handle the VPN connectivity to AWS.
OK, this has been a long post so I think I’ll stop there. Clearly there’s a lot to networking in AWS - hopefully this post has given you an idea of how things work. In the next post, we’ll dive into storage in AWS.