In August 2018, I joined Amazon Web Services as a Solution Architect. Although I was previously at Microsoft working on Azure, the two platforms are somewhat different, so I had to spend a large portion of my time getting up to speed with AWS. There are a huge amount of training courses, white papers and blog posts devoted to all aspects of the AWS platform, however one thing I noticed was that it was difficult to find a good ‘fundamentals’ type guide in one place. This blog post series is my attempt at addressing this gap. I started writing these posts primarily because writing things down helps to cement the knowledge in my mind - but if it helps others, then great.
One thing to point out is that nothing new is being provided here - all the info I’m providing in these posts is available elsewhere (AWS documentation, various training courses, etc) - the point is that writing these posts helps me to learn and is how I would like to see the information flow if I were reading it for the first time.
So, first things first - let’s look at what AWS actually is.
What is AWS?
AWS is a cloud computing platform. At the most basic level, cloud platforms such as AWS provide an alternative to on-premises data centres and infrastructure. The cloud vendor is ultimately responsible for the underlying infrastructure that a customer would otherwise have to manage - facilities, hardware, power, cooling and so on. The cloud vendor typically provides a wide range of services that customers can make use of - these services range from ‘basic’ infrastructure such as compute, network and storage all the way up to machine learning and AI based offerings.
Cloud environments such as AWS typically provide a number of ways to interact with the platform - new users can easily provision services (e.g. creating a virtual machine) through an online portal or via a command line interface. More advanced users may choose to deploy services in a more automated fashion - using ‘infrastructure as code’ type tools such as AWS CloudFormation or Terraform from Hashicorp, or using an API driven approach.
As an example, an AWS user can request a virtual machine (known as an instance in AWS terminology) with a specific amount of CPU and memory and with the operating system of their choice. That user can then choose a particular storage configuration (e.g. number and size of attached disks) and can also select the networking configuration of their choice (for example, number of network interfaces, whether the VM has access to the Internet, etc). Once the user has chosen their configuration, they can deploy the VM within a few minutes into the location of their choice (see regions section below).
One of the key points about cloud environments is that users pay only for what they consume. In the example above, our user deploys their VM, makes use of it for their specific purpose and then has the option to tear down the VM once they are finished with it. The user will only need to pay the cloud provider for the time that VM has actually been up and running.
AWS Regions
Thinking about our example in the previous section, if a user deploys a virtual machine using AWS, where does that VM actually “go”? Does the user have any control at all over which location his or her VM ends up in? How do we even know which country our resources will reside in?
To answer this question, AWS offers its services from data centres it has deployed all over the world - these data centres are deployed into different geographic areas known as regions. When a user provisions a service in AWS, they have the choice to deploy that service into a specific region. AWS is rolling out more regions over time - it’s kind of pointless me giving the figures on this post as they are likely to be out of date within a few months, so you can find the up to date AWS regions list here.
One of the key characteristics of a region is that it provides a very high degree of isolation from other regions. The idea is that, should something happen within a particular region that takes it offline, regions in other locations will be unaffected.
Availability Zones
A region is further subdivided into a number of Availability Zones. An AZ also provides a high level of isolation - the difference here is that AZs residing within a region are connected together using extremely low latency links.
To understand how AZs should be used, here’s an example. Let’s say you have a service you want to deploy consisting of a number of redundant virtual machines (say 3). It’s quite likely that you don’t want those VMs to all be deployed into the same physical facility and would prefer them to be distributed across multiple facilities. In that case, you have the option (and in fact it would be recommended) to deploy each of your 3 VMs into different AZs.
Here’s an example. In the diagram below, we have two regions where we are deploying services (Ireland and Oregon). Each of those regions has three Availability Zones (AZs) and we are deploying some services across these AZs (EC2 instances and database instances).
AWS Services
OK, when looking at the services AWS offers for the first time, the most important thing is not to freak out, because the AWS platform is absolutely enormous. When I first started to look at what AWS offered, I was blown away by just big and comprehensive this platform really is. For evidence of this, take a quick look at the AWS Products web page - you’ll see here that there are hundreds of services and products available ranging from compute, storage and networking, through databases, security services and containers, all the way up to machine learning and Internet of Things (IOT) offerings. Not only that, but there are new services and updates happening constantly. In short, it’s pretty much impossible to be an expert in everything that AWS offers, no matter how hard you might try.
Let’s look at some of the services that AWS offer in some more detail (this is not an exhaustive list by any means!):
Compute:
EC2 - Provides the ability to run virtual machines in the cloud.
Lambda - Amazon’s ‘serverless’ compute offering, allows users to run code in response to events, without having to provision or manage servers.
ECS, EKS and Fargate - these form the backbone of the AWS container offerings. ECS provides managed container clusters, while Fargate provides a form of ‘serverless’ containers (i.e. the ability to run containers without having to manage the underlying instances). EKS provides a managed Kubernetes service for container orchestration.
Elastic Beanstalk - PaaS service providing an application hosting environment, giving the ability to deploy apps without worrying about underlying infrastructure.
Storage:
S3 and Glacier - Provides object based storage and archival capabilities in the cloud.
EFS - Elastic File System. Provides scalable file services for use with other cloud and on-premises resources.
Snowball / Snowmobile - solutions for transporting large amounts of data into the cloud.
Networking:
Virtual Private Cloud (VPC) - a logically isolated network inside the AWS cloud, with complete control over subnetting, access controls, etc.
Direct Connect - dedicated connectivity between on-premises DCs and the AWS cloud.
Elastic Load Balancer - distributes traffic across multiple targets (VMs, containers, etc). Comes in two main versions - Network Load Balancer (layer 4) and Application Load Balancer (layer 7).
This list barely scratches the surface of what’s available in AWS - I certainly won’t be covering every service in this blog series, but instead will focus on the services I think are necessary to consider yourself well versed in the ‘fundamentals’ of AWS.
Finally, let’s look at where to go for more information about AWS.
AWS Documentation and Samples
The main AWS documentation is at https://aws.amazon.com/documentation/. This is a good starting point if you want to learn about any of the available services in AWS. From each of the product areas, you’ll find user guides, case studies, white papers and more.
That’s about it for the first post. In the next post we’ll have a look at setting up an AWS account, as well as monitoring important items such as billing.
I use the Azure CLI for much of what I do in Azure now - true, the same things can usually be achieved through the portal or by using PowerShell, but I just prefer the Linux / Bash nature of the CLI.
One of the things that makes the CLI so nice to use is the powerful query language that it has available - this language is called JMESPath. JMESPath isn’t specific to the Azure CLI though - it’s a query language for JSON (http://jmespath.org/) so it can be used whenever you need to manipulate or query JSON data.
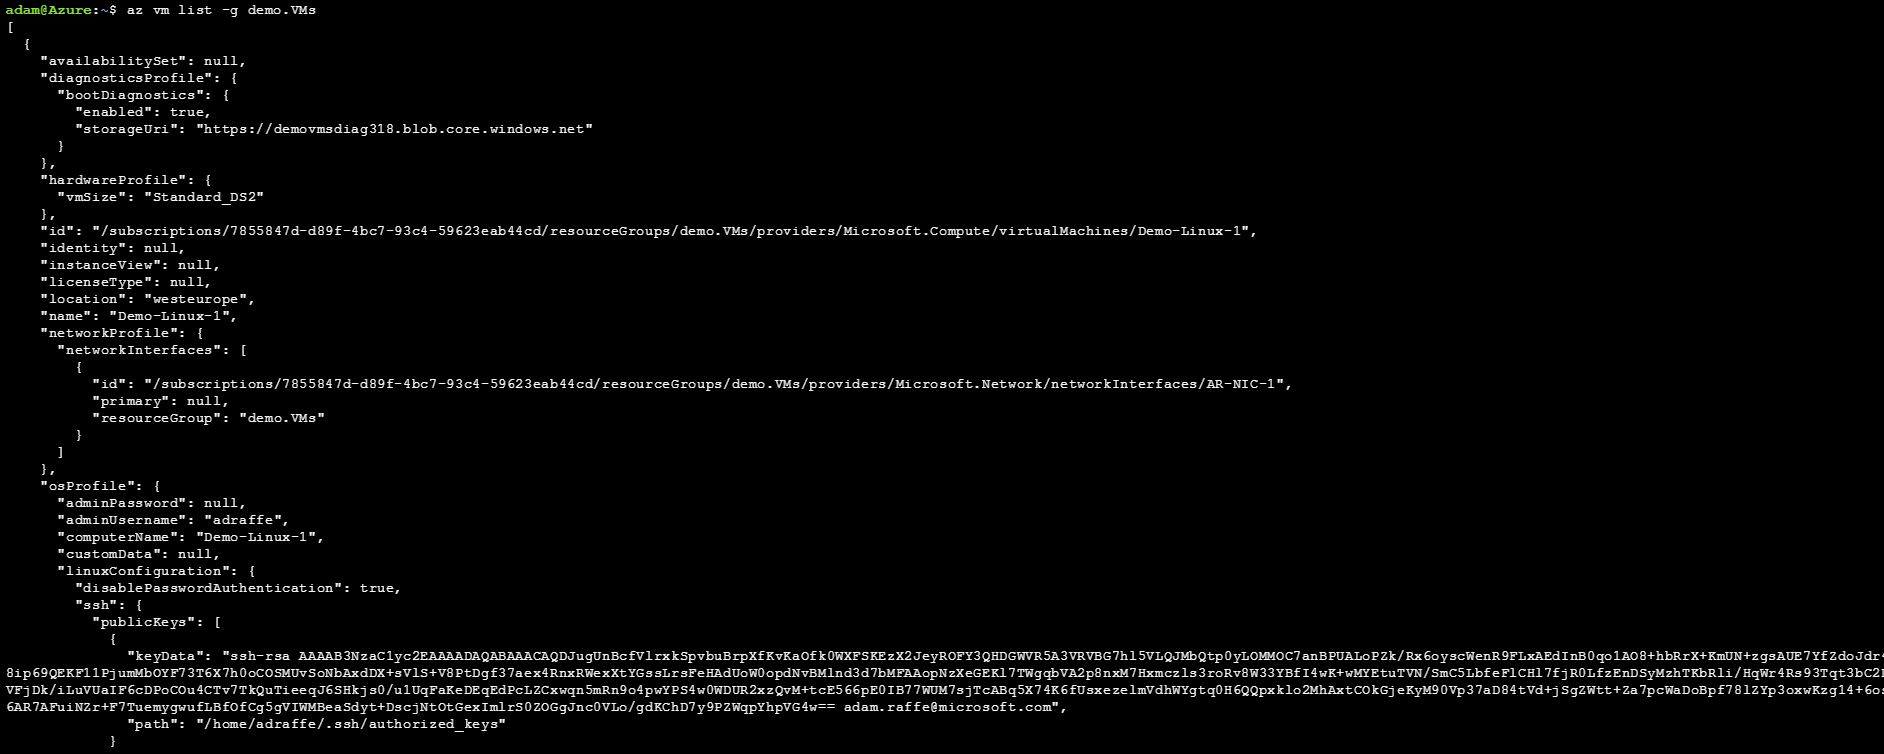
So how can we use it to improve our Azure CLI operations? Let’s start with a simple example. I’ve decided that I want to use the CLI to find out the names of all the virtual machines I have running in a particular resource group. I’m going to start by running the command az vm list -g demo.VMs to return a list of all VMs in the ‘demo.VMs’ resource group (by the way, I’m using the Azure Cloud Shell to run these commands - check it out, it’s great):
Woah! I just got a ton of JSON back from that command. What you see in this screenshot is just the very top of the output for one VM only - this goes on for many more pages. But all I wanted was to find out the names of my VMs! So how do I narrow this down to the information I want? Here’s where JMESPath queries come in.
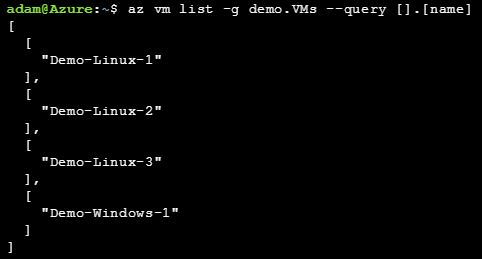
I’ll add a query to the original command that should give me only the names of the VMs. The command I’ll run is as follows:
az vm list -g demo.VMs --query[].[name]
This gives me back something much more civilised:
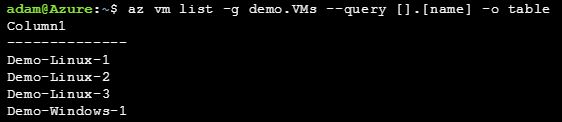
Not bad, but still a bit messier than I would like - let’s try this again with the -o table switch at the end of the command:
OK, that looks better.
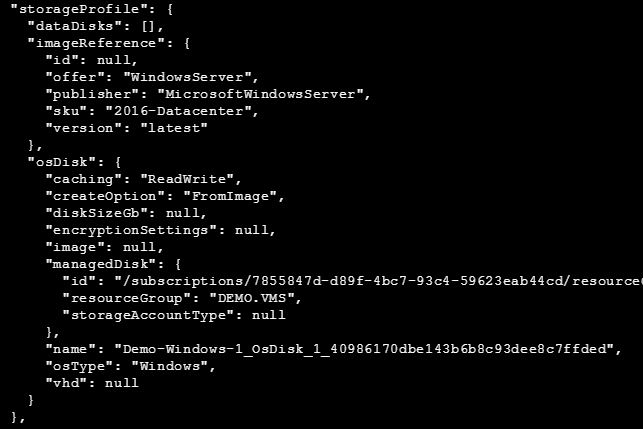
Now, I’ve decided that - along with the VM name - I want to know the name of the operating system disk attached to each machine. I need to add it to the query, but how do I know what to add? Let’s take a look at part of the original JSON query from one of the VMs:
From the above, it looks like the field I am looking for (name) is buried under the ‘storageProfile’ object and then under ‘osDisk’. So let’s add this to the query and see what happens:
az vm list -g demo.VMs --query[].[name,storageProfile.osDisk.name] -o table
Nice! I can now see the name of the VMs and the OS disk used by each one. However, I’m still not happy that the column headings in my tables are simply labelled ‘Column1’, ‘Column2’, etc. To add a nice friendly column heading, I can add the heading I want to the query as follows:
az vm list -g demo.VMs --query"[].{Name:name,Disk:storageProfile.osDisk.name}"-o table
Perfect. Note that this time, I have used curly brackets for the second part of the query, plus I have enclosed the whole query in quotation marks.
In my examples so far, I’m getting information back about both the Linux and Windows VMs that live in my resource group. The problem is, I’m only really interested in the Windows VMs - so how do I narrow this query down even further to only include the Windows machine? Well, we can set up the query to look only for the elements in our array containing a certain value - in this case, we want to make sure that only the elements that contain ‘Windows’ make it into our output. Here’s how it’s done:
az vm list -g demo.VMs --query"[?contains(name, 'Windows')].{Name:name,Disk:storageProfile.osDisk.name}"-o table
This gives us the following:
Now let’s take this a bit further. Suppose I want to get a list of all the VMs not currently running (i.e. deallocated) and with ‘Linux’ in the name - and then start those VMs. One way of achieving this is to do the following:
az vm list -g demo.VMs --show-details--query"[?contains(name, 'Linux') && powerState == 'VM deallocated']".id -o tsv | xargs -L1 bash -c'az vm start --ids $0'
There’s a bit going on here, so let’s break it down. In the first part of the command, we run the az vm list command, but this time we add the –show-details parameter (only this extended version of the command shows the power state of the virtual machine). Then we add a query that returns only those VMs that a) have ‘Linux’ in the name and b) have a current power state of ‘VM deallocated’. We also want to make sure that we return only the ID of the VM - hence the .id on the end of the query. Now the table output format that we’ve been using up until now isn’t going to work here, so we’ll need to use a different output format - in this case we’re going to use the tab separated output format (-o tsv) instead.
In the second part of the command, we’re taking the output of the first command (which returns the IDs of the VMs we are interested in) and piping this to the az vm start command. The xargs command is used to pass the output values from the first command as input values to the second.
There’s a whole lot more you could do with JMESPath queries - check out the JMESPath site here for more info.
Also, my colleague Rich Cheney put together a self paced lab guide around Azure CLI, BASH and JMESPath - check it out here.
A few months back, I created a lab workshop focused around building virtual data centres in Azure (see here for more details). Given how successful this workshop has been when running it with partners, I’ve now recorded a video with my colleague Dan Baker that takes viewers through the whole process of building the VDC environment. The video is less than an hour long and will walk you through the entire lab build, explaining each step along the way.
A question I’ve heard a few times recently is “if I have services running in an Azure Virtual Network, how do I securely connect that VNet to Azure public services, such as Blob Storage?”. Microsoft have this week announced a couple of features designed to help with this scenario, but before delving into those, let’s look at the issue we are actually trying to solve.
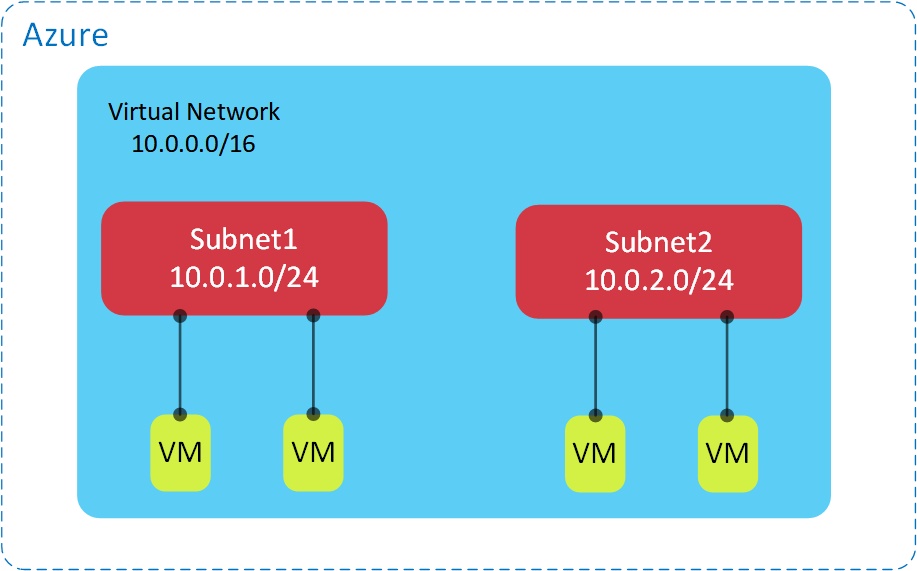
First, a few basics: a Virtual Network (VNet) is a private, isolated, network within Azure into which you can deploy infrastructure resources such as virtual machines, load balancers and so on:
Although these VMs can (and very often do) have direct Internet access, it is of course possible to restrict connectivity into and out of this VNet according to your requirements.
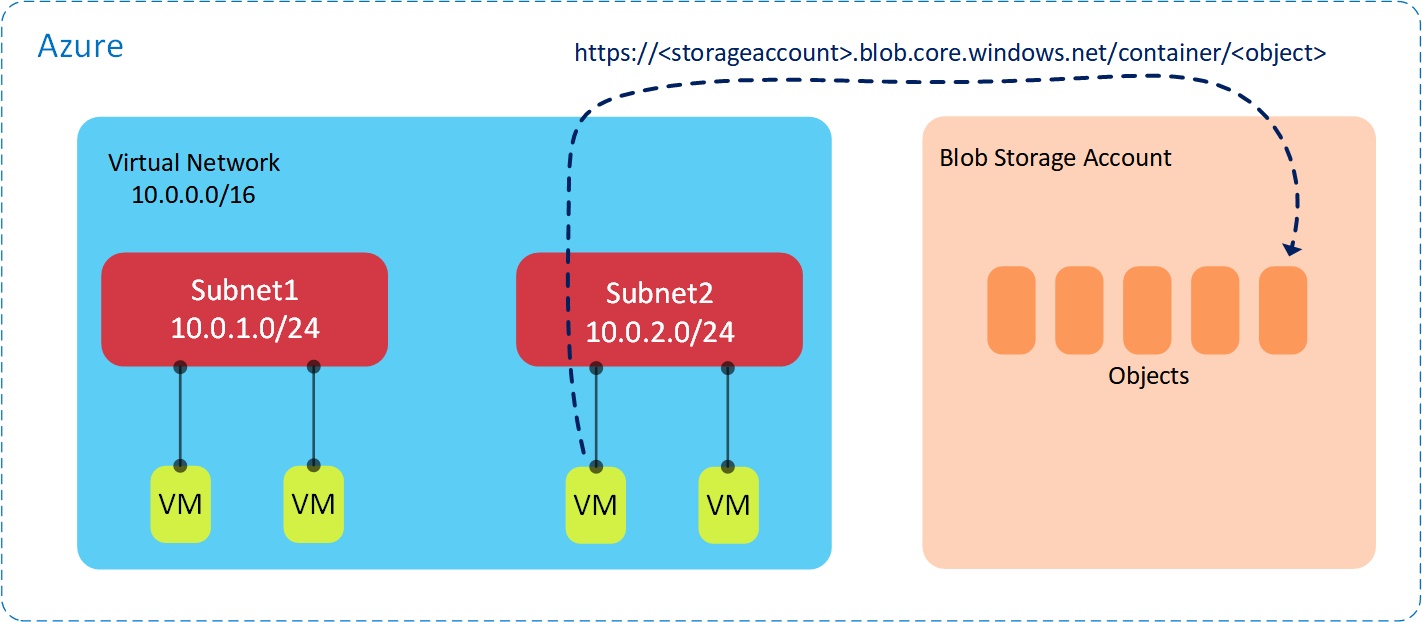
Now consider the myriad of public services available in Azure, such as Blob Storage and Azure SQL. As these services are public, they do not sit inside a virtual network and are not isolated from the “outside world”. The question is, if I want to connect from a VM inside a VNet to a public service such as Blob Storage, how does that work? It’s actually pretty straightforward - VMs connect to Blob Storage or other Azure services using the normal Internet facing end points (e.g. _.blob.core.windows.net), as shown in the following diagram:
OK, that’s fine - but doing it this way does open up a couple of issues:
The VM needs Internet access - what if I want to prevent the VM from having Internet access but retain access to the Azure services only?
The storage account in question is open to anyone else on the public Internet (true, there are various authentication mechanisms such as SAS tokens, but the storage account URL is still fundamentally ‘open’ and not as private as we would like).
Let’s deal with these one at a time.
How do I structure Network Security Groups to allow access only to Azure services?
In this scenario, I want my VM to have access to Azure Blob Storage, however I don’t want that VM to be able to access the wider Internet. Network Security Groups (NSGs) seem like the obvious choice here, but what addresses should I allow or deny in the rules? Do I allow access to the specific Azure data centre IP ranges for storage and deny everything else? What happens if those IPs change at any point?
Luckily, there is now a solution to this issue: NSG Service Tags, which were announced this week and are currently in preview. The idea behind Service Tags is simple: when defining NSG rules, you use the Service Tag for the service you are interested in as the destination, instead of IP addresses. So in my example above, I would have an NSG rule allowing access from my VNet to the storage service in my region (defined using a Service Tag), followed by another rule denying all other Internet access from that VNet.
The rule allowing access to storage would look like this:
So by using NSG Service Tags, we can simply specify the Azure public service we want to give access to without having to worry about IP addresses - much easier.
Public services have Internet reachable IP addresses and are therefore not truly ‘private’.
Our second issue is that - regardless of the authentication mechanisms we implement - the IP addresses for our Azure public services are fundamentally reachable by the entire Internet and therefore cannot be considered truly ‘private’. Wouldn’t it be much nicer if we could have a private connection between our Virtual Network and the service in question? Well, we’re in luck - also announced this week were VNet Service Endpoints, a method of extending private address space to Azure services, such as storage and SQL.
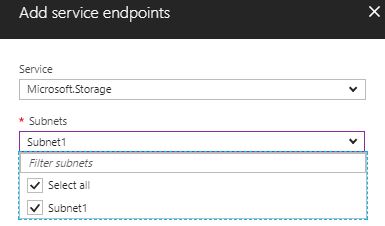
To enable this, the first thing we do is enable Service Endpoints on the VNet (in this case, I’m using storage as an example):
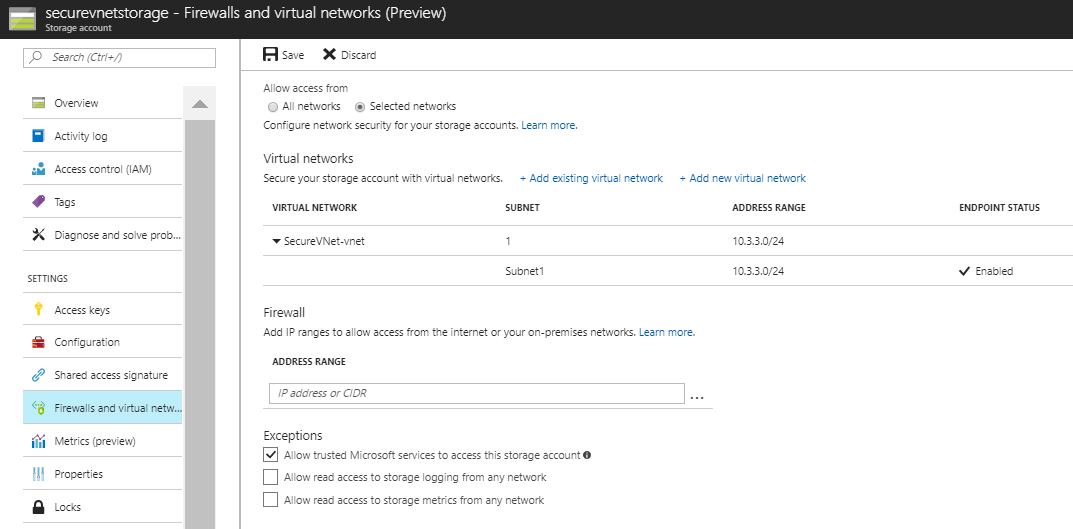
The second thing we need to do is to turn off access from any network on the storage account and only allow the specific VNets in question. This is done from the storage account configuration:
Now that that’s configured, the VM within my VNet / subnet can access objects within the storage account, while that same account can no longer be accessed from the Internet:
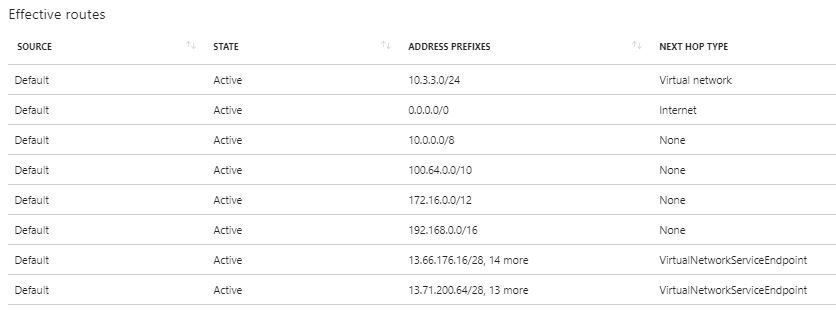
If we take a look at the effective routes associated with my virtual machine’s NIC, we can see that we have some additional routes added for the service endpoint:
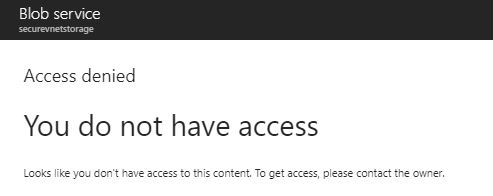
One other interesting point is that I can no longer access the storage account even from within the Azure portal:
That’s it - hopefully it’s clear from this post how these new features make securing access to Azure public services much easier. Thanks for reading!
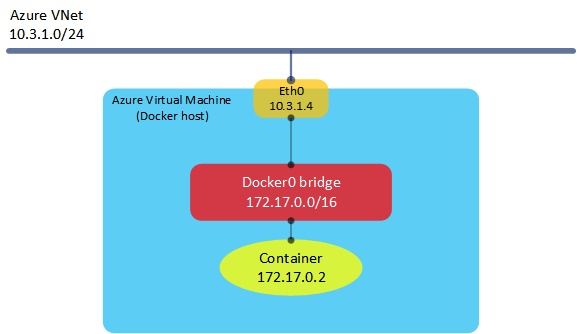
Azure has a number of ways in which to run containers, ranging from simple IaaS VMs running Docker, to Azure Container Service (a service that provisions a full container cluster using Kubernetes, Swarm or DC/OS) and Azure Container Instances. One of the characteristics of these services is that when a container is provisioned, it typically has an IP address allocated to it from within the local host, rather than from the Azure virtual network to which the host is connected. As an example, consider the following scenario where we have a single Azure IaaS virtual machine running Ubuntu and Docker:
In the very simple example above, we have an Azure virtual machine running Docker attached to a virtual network, which has an address range of 10.3.1.0/24. The host itself (or technically, its NIC) is allocated an IP address from the VNet range. The container itself is allocated an IP address from the Docker0 bridge address range (typically 172.17.0.0/16). Although this works fine (NAT takes place within the host to connect the container to the outside world), we lose a certain amount of visibility into the container’s address space from the Azure world - so it becomes more difficult to apply Azure networking features such as Network Security Groups (NSGs). Wouldn’t it be nice if we could have our containers sitting directly on an Azure VNet, with an IP address assigned from that VNet range? In fact, we can now do this using a set of network plugins, available here. Let’s have a look at how these plugins work.
For this example, I’ll be using the CNM (Container Network Model) plugin - there is a CNI (Container Network Interface) version also available. I won’t go into the differences between these two models here as it has been covered at length elsewhere (e.g. here). So the first thing I’ll do is download the plugin and run it in the background (I am using the latest version, which is 0.9 at the time of writing:
curl -sSL https://github.com/Azure/azure-container-networking/releases/download/v0.9/azure-vnet-cnm-linux-amd64-v0.9.tar.gz
tar xzvf azure-vnet-cnm-linux-amd64-v0.9.tar.gz
sudo ./azure-vnet-plugin&
Now that we have the plugin running, we can create a new Docker network using the Azure driver:
Let’s break down the above command: first, note that we are creating a network called ‘azure’ using the azure-vnet driver, but also that we are using the azure-vnet IPAM driver for IP address management. This IPAM plugin is necessary for allocating IP addresses to our containers directly from the Azure fabric. For the subnet, we need to match this with the subnet within the Azure VNet that we are connecting to. Let’s verify what we just created:
adraffe@Docker-Host:~$ sudo docker network ls
NETWORK ID NAME DRIVER SCOPE
e7b58e62fb38 azure azure-vnet local
9894d83e1ebc bridge bridge local
3697ca264bfa host host local
64eb1143821e none null local
Now that we have the network created, let’s have a look at what has been created on the host using ifconfig:
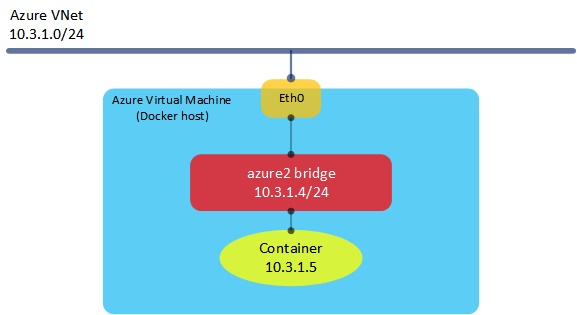
Here, we can see that a new bridge has been created called ‘azure2’. This sits alongside the standard ‘Docker0’ bridge and will be used for connecting our containers to once they have been created. Note that the IP address of this bridge is 10.3.1.4 - this address happens to be the IP of the Docker host itself, allocated from the Azure virtual network.
OK, so let’s create a container and try to connect it to our VNet. I’ll spin up a basic Alpine image and connect it to the network created above:
adraffe@Docker-Host:~$ sudo docker run -it--net=azure alpine
docker: Error response from daemon: No address returned.
Hmm, that didn’t work - it seems that I’m not getting an IP address allocated to my container. Why is this? The reason is that - right now - we need to pre-allocate IP addresses in Azure in order to make them available to containers. This could of course change (and hopefully will) in the future. In order to pre-allocate an address, I need to create an additional IP config and apply it to my Docker host’s NIC. I could do this in a number of ways (portal, ARM templates, etc), but I’ll use the Azure CLI here:
az network nic ip-config create -g Docker --nic-name docker-host191 --private-ip-address 10.3.1.5 --name IPConfig2
Now that we have this additional IP address in place, let’s try creating the container again:
adraffe@Docker-Host:~$ sudo docker run -it--net=azure alpine
/ # ifconfig
eth0 Link encap:Ethernet HWaddr B6:EC:0A:16:CF:59
inet addr:10.3.1.5 Bcast:0.0.0.0 Mask:255.255.255.0
UP BROADCAST RUNNING MULTICAST MTU:1500 Metric:1
RX packets:7 errors:0 dropped:0 overruns:0 frame:0
TX packets:0 errors:0 dropped:0 overruns:0 carrier:0
collisions:0 txqueuelen:1000
RX bytes:586 (586.0 B) TX bytes:0 (0.0 B)
This time, the container is created - doing an ifconfig from within the container shows that it has an IP address of 10.3.1.5, which sits directly on the Azure VNet I am using. Let’s have a look at what this looks like:
Connecting Kubernetes Clusters to Azure Virtual Networks
The example above was pretty simple - just a single host running Docker with a very basic container setup. What if I want a full Kubernetes cluster connected in to my Azure VNet?
By default, ACS with Kubernetes uses a basic network plugin called kubenet. With this approach, Kubernetes pods are deployed to a subnet that is different to those residing in the Azure VNet. The ACS Kubernetes plugin works in a very similar way to the example I showed in the first section above - a number of additional IP addresses are added to the host’s NICs and are then allocated to Kubernetes pods as they are created, allowing pods to sit directly on Azure VNets and allowing full use of the Azure SDN features, such as Network Security Groups.