AWS Fundamentals - Part 4: Identity & Access Management (IAM)
20 Feb 2019Identity & Access Management (IAM) is one of the key building blocks of AWS - before jumping in to the other services, it’s important to have a basic understanding of how IAM works, hence the reason for covering it fairly early on in this series.
So what exactly is IAM and how is it used? At its core, IAM is a service that provides the ability to control access to resources in AWS. What kind of entities would require access to AWS resources? Well, users and groups are the obvious ones, but IAM also provides the ability to allow services in AWS to access other services.
IAM Users and Groups
Let’s start with the basics: at the risk of stating the obvious, IAM provides the ability to define users and the groups those users are members of. I also don’t think you’ll be too surprised to hear that IAM allows you to grant certain levels of access to those users and groups. So far, so good. But let’s take a look at some of the more interesting aspects of users and groups, beginning with the root credentials for your account.
Root User Credentials
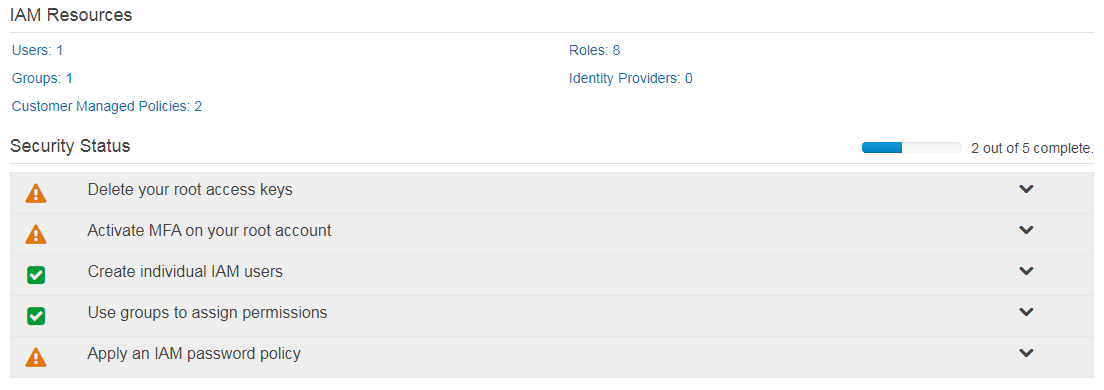
When you first create an AWS account, an identity is created for you called the root user - this is the email address and password you used when creating the account. These root user credentials have full, unrestricted access to all aspects of your AWS account. Now of course, you could quite happily use these root credentials to access your account on a day to day basis - however, alarm bells should start ringing at this point. Once the initial setup is complete, do you really need unrestricted access into your account? Probably not - therefore it is very very strongly recommended that you do not use the root user credentials for every day access to your AWS account (even for administrative tasks). You should also set up Multi-Factor Authentication (MFA) on the root account to provide even more protection against misuse of these credentials.
Helpfully, the AWS console is aware of these recommendations and tries to save you from yourself. Logging into the IAM area of the AWS console, you’ll be presented with a page which urges you to a) delete your root access keys and b) set up MFA on the root account:
So if we shouldn’t use the root credentials for admin tasks, what should we use instead? Easy: we set up a new IAM user, assign the required administrative privileges to that user and then use that new user for the majority of administrative tasks.
Principals
An user is just one example of a principal. A principal is simply an entity that can make a request to a resource in AWS. So our users that we create in IAM are principals. Our root user that we created when setting up our account is a principal. What else qualifies as a principal? Well we haven’t covered them yet but roles, federated users and applications are all principals too.
One thing that isn’t a principal is a group - a group is really just a way of providing access to multiple users at once, so it can’t be considered a principal in its own right.
Passwords, Access Key IDs and Secret Access Keys
When you create a new user in IAM, you have a decision to make about how you will interact with AWS: will you use the AWS console, will you be using programmatic access (CLI, API, etc) or will you be doing both? The choices you make here determine whether you will be issued with a password, an access key ID & secret access key, or possibly all of those. Let’s look at these options in a bit more detail.
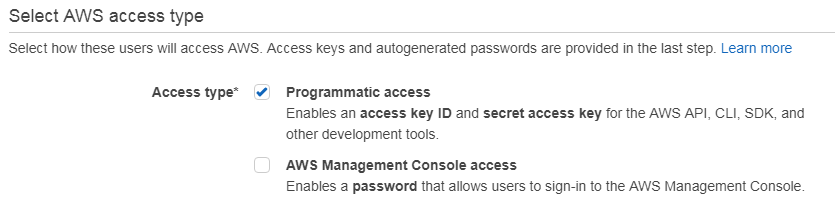
If you choose ‘AWS management console access’ when creating a user, you will be issued with a password. You’ll use that password to access the console - yep, just a plain old password, nothing out of the ordinary there. If however you check the box named ‘programmatic access’, upon creation of the user you’ll be issued with an Access Key ID and a Secret Access Key. These credentials are used for accessing AWS programmatically, for example using the AWS CLI. It’s quite important that you make a note of these credentials when they are displayed here - the reason for this is that they will never be shown to you again. Like, ever. If you lose these credentials, you’ll have to create a new access key ID / secret access key pair.
Note that you can’t use the password for programmatic access, nor can you use the access key ID for console access.
IAM Policies
When you create a user in IAM, that user doesn’t necessarily have access to any resources - in fact, the default is to not assign any permissions to that user. A user without access to anything probably isn’t going to be all that useful to you, so how do we assign permissions to our user? The answer is IAM Policies.
An IAM policy is really just a way of defining what actions can be taken for a given resource. Here’s a really simple example of an IAM policy:
    {
        "Version": "2012-10-17",
        "Statement": [
            {
                "Effect": "Allow",
                "Action": "*",
                "Resource": "*"
            }
        ]
    }
Hopefully it’s pretty easy to see what is going on here; this policy is allowing all actions (*) to be performed on any resource (*). In fact the JSON shown above defines the built in ‘AdministratorAccess’ policy within IAM. OK, that was easy, but can you guess what this next policy does?
    {
        "Version": "2012-10-17",
        "Statement": [
            {
                "Effect": "Allow",
                "Action": [
                    "s3:Get*",
                    "s3:List*"
                ],
                "Resource": "*"
            }
        ]
    }
This policy gives the users or groups to which it has been assigned the ability to perform only a couple of operations: S3 Get and List. So this essentially grants read only access to the S3 service.
Identity Policies, Resource Policies and Trust Policies
Now that you understand what a policy is, let’s make it slightly more complicated by introducing a few different types of policy.
First up is the Identity-Based Policy - this is probably the simplest policy type to understand as it involves applying the policy directly to an IAM identity. In other words, you assign the policy to a user, group or role and that identity will assume the permissions specified in the policy.
Next, we have Resource-Based Policies. The idea here is that the policy is applied to the resource, rather than the identity. For example, let’s say I have an S3 bucket (we’ll cover exactly what this is later on, but for now, think of this as an area of storage reserved for you in AWS). I want to apply a policy to this S3 bucket that allows only certain principals (i.e. users, groups or roles) to have a desired level of access. I can use a resource based policy to achieve this.
Finally, we have Trust-Based Policies. This policy type is attached to a role and defines which principals can actually ‘assume’ that role.
I’ve mentioned roles a few times already in this post, so at this point I probably ought to explain what they are, which leads me nicely into the next section.
Roles
Imagine you have an application running on an EC2 instance in AWS. That application needs to occasionally write some information to an S3 bucket, but requires credentials to do so. In this scenario, you could place the credentials on the EC2 instance, but this isn’t a great solution longer term: it’s not all that secure and should any credentials need to be revoked, all the EC2 instances you are running would need to be updated with the new ones. A better solution in this case is to use Roles.
So what does a role do? Essentially, it is a way of assigning a set of permissions to any entity that requires them. Using roles, you can delegate access to users, groups or AWS services when they need it.
Let’s look at a couple of examples, starting with a really simple one: giving a user the ability to switch to a different role.
Users Switching Roles
An IAM user has the ability to switch to another role - by doing so, that user will temporarily receive the permissions associated with that role. Note that the permissions associated with the role are not added to the user’s original permissions; instead, they replace the original permissions. Once the user has completed their tasks, they can switch back to their original permissions.
To create the policy, two main things are needed: a permissions policy and a trust policy. We’ve already seen what permissions policies do earlier in the post - they simply specify what permissions the entity will receive. I also mentioned trust policies briefly earlier on. A trust policy specifies which principal(s) can assume the role. So in our simple example, the trust policy would need to specify the user who actually wants to make use of that role.
In this example, I create a role called S3Access. Under the ‘Trust Relationships’ tab within this role, I will have a trust policy that is defined as follows:
    {
      "Version": "2012-10-17",
      "Statement": [
        {
          "Effect": "Allow",
          "Principal": {
            "AWS": "arn:aws:iam::<account-id>:user/araffe"
          },
          "Action": "sts:AssumeRole",
          "Condition": {}
        }
      ]
    }
Note that under ‘Principal’, I have put in the ARN (Amazon Resource Name) of my user. We covered ARNs in part 3 of this series.
Also note that where
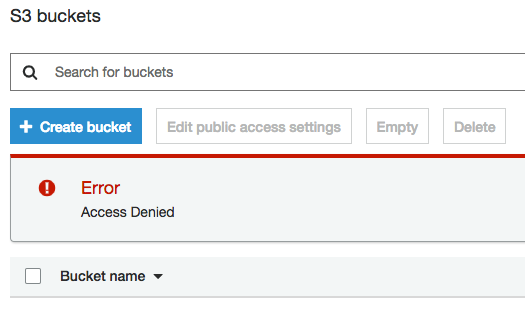
OK, so if I first log in to the AWS console as ‘araffe’, I can see that I don’t have any access to S3:
But I know there is a role available that I have been given permission to assume, so I can switch to it using the drop down menu on the top right of the screen. I need to provide the account number where the role resides, as well as the name of the role.

Once I switch to the new role, I am able to see all of the S3 buckets in my account. I can also switch back to my original user when I am done and no longer need to permissions associated with the new role.
Assigning Roles to Services
As mentioned at the beginning of this section, roles can be assigned to services within AWS to allow access to other services. Let’s look at an example:
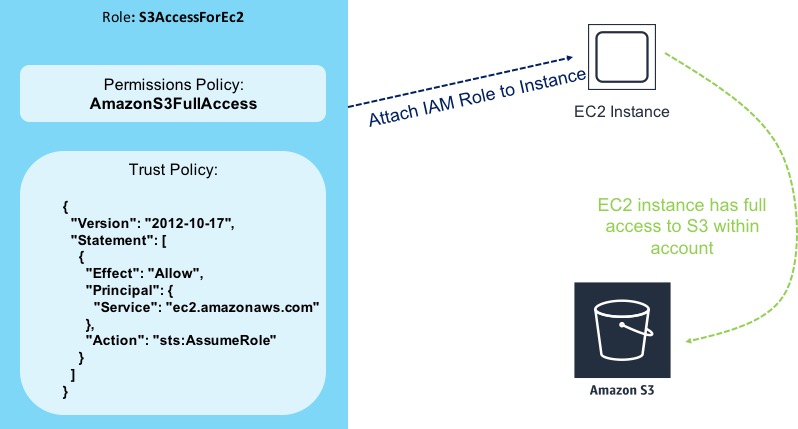
In this scenario, I have created a new role called S3AccessForEc2. This role has a permissions policy attached to it called AmazonS3FullAccess - you can guess what permissions this allows. There is also a trust policy within the role that states that the role can be assumed by EC2 instances (i.e. an EC2 instance can utilise this role and it will inherit the permissions specified in the policy).
So now, I can attach the IAM role to one of my instances (this can easily be done in the EC2 area of the console, or via the CLI / API). Once I’ve attached the role, the EC2 instance has full access to S3 inside my account.
So what’s actually going here behind the scenes? Well, when I attach the role to my EC2 instance, the instance receives a set of temporary credentials to enable it to access the resource (in this case, S3). You can actually view information about the role and temporary credentials from within the EC2 instance by querying the metadata. I’m going to cover metadata in a bit more detail in part 6, but for now let’s have a look at the role the instance has assumed:
[ec2-user@instance-1 ~]$ curl http://169.254.169.254/latest/meta-data/iam/info/
{
"Code" : "Success",
"LastUpdated" : "2018-12-20T16:01:32Z",
"InstanceProfileArn" : "arn:aws:iam::<account-number>:instance-profile/S3AccessForEC2",
"InstanceProfileId" : "AIPAJJL7DAT55YSVHGSXW"
You can see from this that the instance is using the ‘S3AccessForEC2’ role that I created earlier. Now let’s look at the temporary credentials:
[ec2-user@instance-1 ~]$ curl http://169.254.169.254/latest/meta-data/iam/security-credentials/S3AccessForEC2/
{
"Code" : "Success",
"LastUpdated" : "2018-12-20T16:00:37Z",
"Type" : "AWS-HMAC",
"AccessKeyId" : "ASIAS2ZYOD7N65NE5WRV",
"SecretAccessKey" : "mli9txph9xCRw4zlVTsiKhnBMRHmNEsIHYRfr6z6",
"Token" : "FQoGZXIvYXdzEFkaDEvvpVBAdc3BpEiiOyK3A/kmKEUUoYqT1eyW5UNa44tiQT2BDMYj1c6/f8Erv8aHHRtHk7Ld5YEhPUo5WgfxTDbWrf5MRum/fXdSGJgYGbeyVZIcvZbJ54r7K5qzAHAfvIFH9lpWAQU5YZifiiw4mDAkSOE89dGvFBvQ1pZlP/0X79Q5Msyd1Huf4Hsppup22Nm7CgtNJC/nta1qwHpGqcZRV3T18rutYzPF9HRY0rkV8qSHzfgL2BZcDQks6dokQAty+P/btkS487TS44FDjw5fgC3VAMMYBxx/2vdCFwRzExi3kLz0NsjGzvmf9uWgbFteUBuDoEFV/LKIzegyXPgc5knAI0FDoTdDxSKYDs5hTGOxGecU6ktfuEFSIXIN5xaLzupWtsiwq0Z5a2D5SvgDWcY8YKN8Dx90apxNdfRBaAFXMjNJYtCAAYIFPqoVd41S7xpoqSU0oVohDhME+kmdL7542QUgOrIsrCsk1n7ze5b3t/d1xSK/Y+3yE4Z3ngS/8F0aVpEWw/k7plNn0tDTXkpukmwUWBvhEGigVKxfjczWfI6OwaA383OWqW+VSGR/+5pUioERjEjCadFKGCFQQzIXXnUoofnu4AU=",
"Expiration" : "2018-12-20T22:35:33Z"
You can see here that my EC2 instance is using the temporary credentials shown (access key ID, secret access key and token) to access S3.
Cross Account Access
Let’s say you have two AWS accounts - one for production and one for development. There are some resources in the development account (for simplicity let’s say it’s an S3 bucket) that you want users within the production account to use. How do you achieve this? One way to do it would be to just create a new user for each person that needs access within the development account and then give the username / password to those people. The trouble is, those people then have to log out of the production account and log back in to the development account in order to use the resources. It might work, but it’s not a particularly nice way of doing things.
Happily, there’s a way to grant access to resources between accounts using IAM, which means those users don’t need to continually log in and out of the different accounts. Here’s an example of how this works:

Let’s go through this step by step. The first thing I do here is create a new role inside the Production account (this account has the ID 33334444). The role has permissions assigned to it that allow full access to S3. The role also has a trust policy assigned that states ‘account ID 11112222 can assume this role’. What this actually does is creates a trust relationship between the two accounts, which means that rights can be granted to users in the development account (11112222) to assume the role.
The second step is to actually grant users in the development account the ability to assume the ‘S3AccessCrossAccount’ role in the production account. The easiest way to do this is by attaching a policy to the ‘DevUsers’ group (which in turn contains our users) that allows them to assume the role. That might look something like this:
{
"Version": "2012-10-17",
"Statement": {
"Effect": "Allow",
"Action": "sts:AssumeRole",
"Resource": "arn:aws:iam::33334444:role/S3AccessCrossAccount"
}
}
Once this is in place, our development account users can switch to the ‘S3AccessCrossAccount’ role in exactly the same way I discussed in the previous section, which allows them to access our S3 resource.
Right, that’s enough IAM for now - like I said at the beginning, it’s important to understand IAM as so many other services rely upon it. Now that’s out of the way, we can move on and actually start to create some useful resources, starting with EC2 instances.