AWS Fundamentals - Part 2: Accounts, Billing, Organisations and ARNs
20 Feb 2019So now you know what AWS is and you’re raring to get going. What do you need in order to start spinning up services? The very first thing you’ll need to do is set up an AWS account.
Accounts
In order to create resources within AWS, you must sign up for an account. An account contains all of your instances, virtual private clouds, storage and any other type of resource that you may wish to use. An account is completely dedicated to you (or other users you want to add) and you will be billed monthly for the usage within the account. It’s not possible for other customers and users of AWS to have any access into your account (unless you want them to of course).
Every AWS account has an account number associated with it - you’ll often need to use this account number for logging in, as well as giving other accounts access and other operations.
When you first create an account, you’ll need to provide a valid email address - this email address will become the username for the root account. I’ll be covering this in the IAM section so won’t go into any more detail here. You’ll also need to provide some information about payment methods and some other info such as phone number.
Once you have your account provisioned, you can dive in and begin creating AWS resources!
Billing
As mentioned in part 1 of this series, with AWS you pay only for the services that you use on a monthly basis - so if you have 10 EC2 instances (virtual machines) running, you are only paying for the time that those instances are in use. If you choose to shut those instances down, you won’t be charged for them (although you may still be paying for any underlying storage used by those instances).
It’s important to understand how the resources you are using are charged for - it may differ depending on the service you are using. For example, on-demand EC2 instances are billed based on the amount of time they are up and running for, with most charged on a per-second basis. If however you are using the Cloudfront content delivery service, pricing is based on a number of factors including data transferred out and the number of HTTP / HTTPS requests made. It’s fairly easy to estimate the costs you will incur for any given service using the AWS Simple Monthly Calculator, or the new calculator, which is in beta at the time of writing and therefore doesn’t yet have all services available.
Billing and Cost Management Dashboard
So how do users of AWS keep track of their spending in the cloud? Now that you have the ability to spin up virtual machines, storage, networking and a whole host of other resources within seconds or minutes, it would be very easy for spending to spiral out of control. Fortunately, AWS provides a number of tools that can help you to manage this and make sure that doesn’t happen. The billing and cost management dashboard is one of these tools.
The goal of the billing and cost management dashboard is to give you a quick ‘at-a-glance’ view of what you have spent on a month by month basis. It gives you a graphical breakdown of the services you have consumed, as well as a view of last month’s costs and forecasted costs for next month.
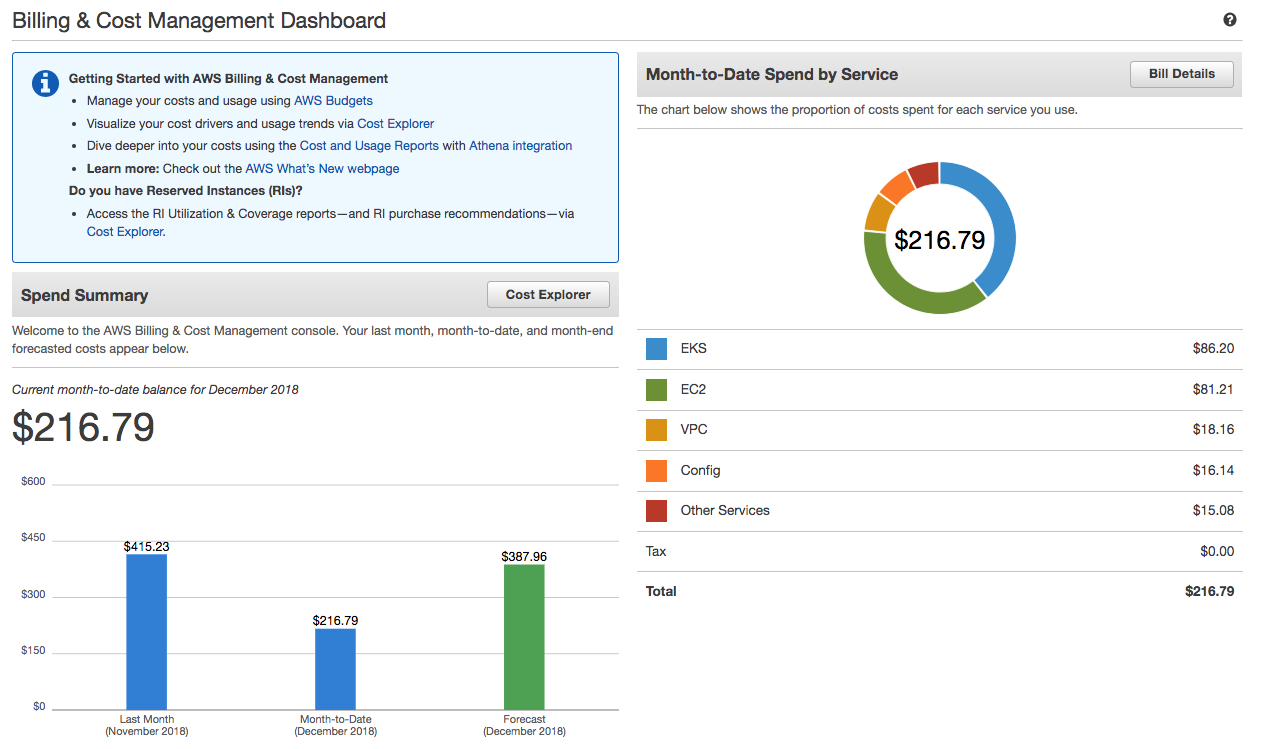
In the above example, the current month’s costs are just over $216 and you can see how these are broken down on the right hand side of the screen. You can see that this user has spent roughly $86 on EKS (Elastic Container Service for Kubernetes), with a similar amount being spent on EC2 instances. The rest of the month’s spend is between VPC costs, AWS config and a number of other services. Clicking on the ‘Bill Details’ button on the top right of screen takes you to a page where you can view the full bill for the month, as well as bills for previous months.
Cost Explorer
The billing and cost management dashboard is useful for a quick view of the month’s spend, however it doesn’t provide any detail about spending patterns or trends over time. The Cost Explorer tool is designed to fill that gap by providing reporting and analytics capabilities to help manage spending.
To get started, Cost Explorer has a few preconfigured views that allow you to look at the monthly costs per service, daily costs and a number of others. Here’s an example of a Cost Explorer view of the monthly costs per service:
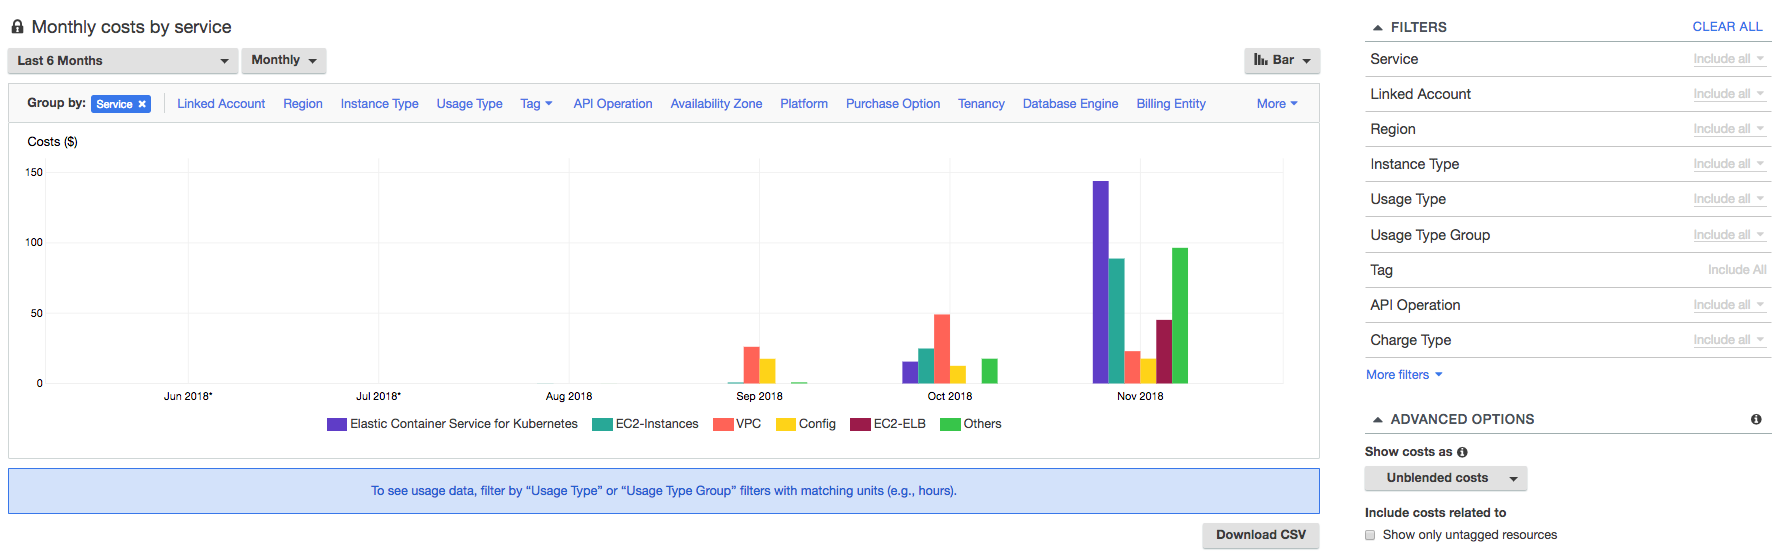
The example above shows the monthly costs in my own AWS account, broken down by service (if you’re wondering why there are no costs shown before September, that’s because I didn’t start working at AWS until the end of August :-)). On the right hand side of the screen, I can filter this further based on service - so if I wanted to see the costs only for the London region (eu-west-2), I could apply a filter to show me that info. Once you have a view that you are happy with, you can save it for future use. You can also download the data from your reports into a CSV file.
Budgets
Being able to easily view spending information using Cost Explorer and the billing dashboard is great, but you are mostly (apart from the forecasting capabilities) viewing info about spending that has already taken place. What happens if someone spins up a large EC2 instance without your knowledge and you want to be notified if your costs exceed a certain amount? For this, you can use budgets.
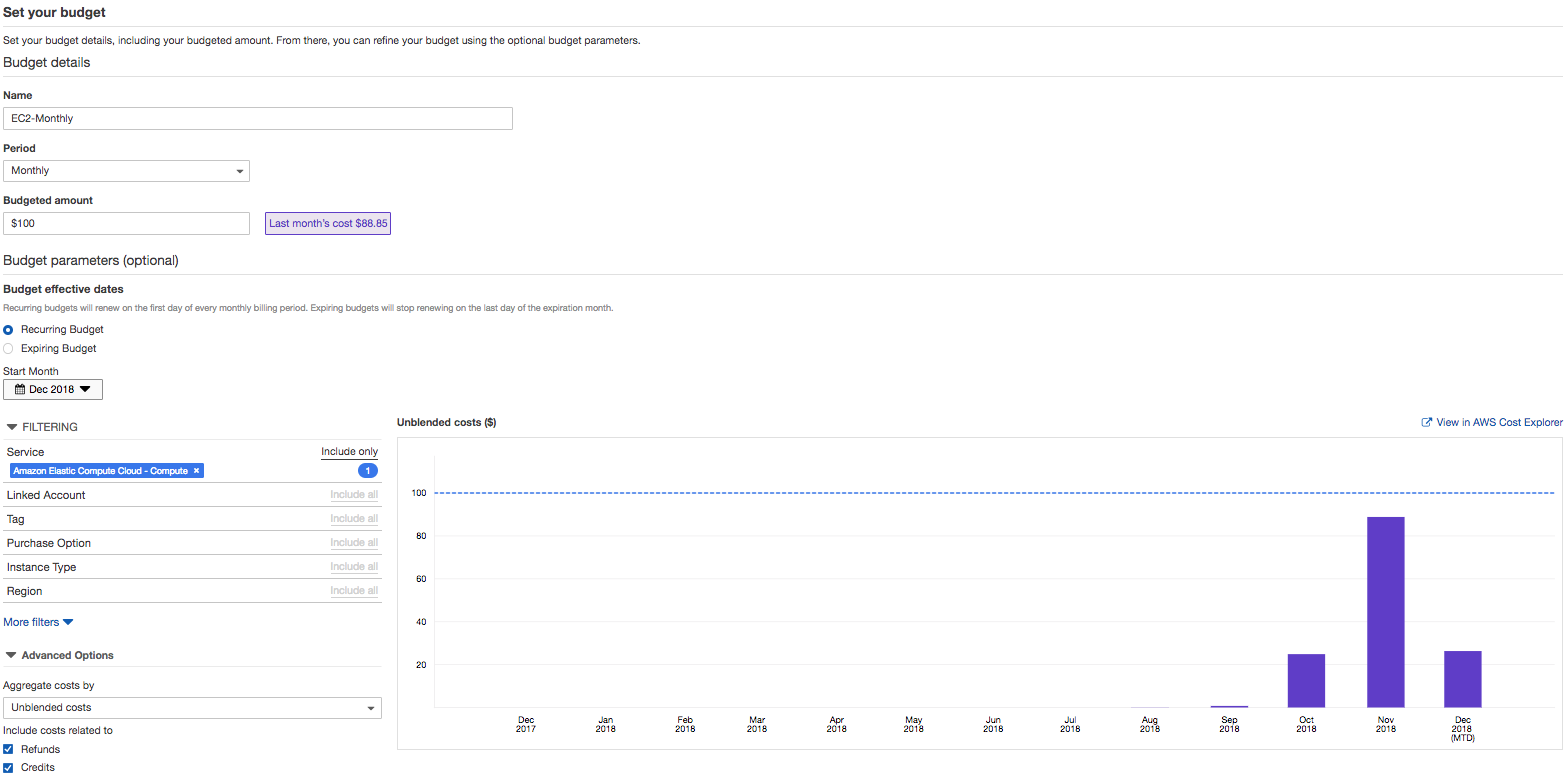
A budget can work in a couple of different ways. Firstly, you can set up a cost budget that will monitor the costs within your account(s) against a threshold that you set and the notify you if that threshold is exceeded. In the example below, I am setting up a budget of $100 on a monthly basis, specifically looking at the EC2 service. If my EC2 spend exceeds $100, I’ll be notified.
The second option is to create a budget based on usage rather than cost. The following example shows how this works:
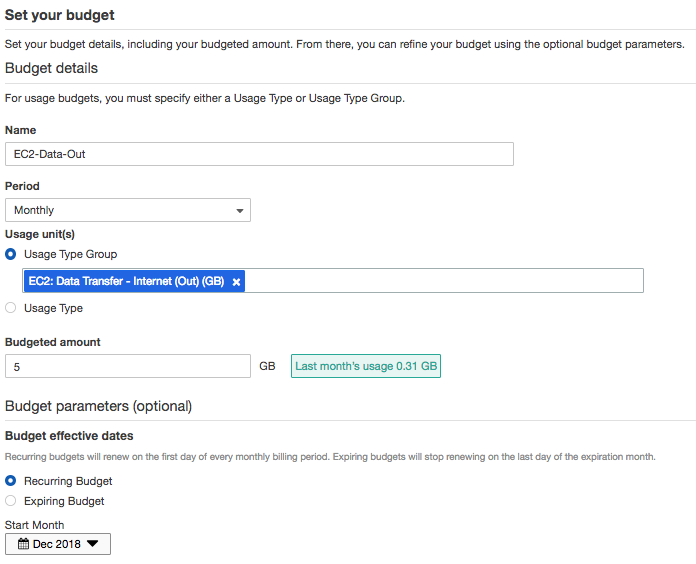
In the above screenshot, I’ve created a usage budget that measures the amount of outgoing data from EC2 - if my monthly budget of 5Gb of data is exceeded, I will receive a notification. Other examples of usage budgets are the amount of S3 storage used, region to region data transfer, or number of running hours for Elastic Load Balancers.
Organisations
Having one AWS account to manage is fairly easy - all resources are created in that one account and the billing is easy to manage through the tools mentioned in the sections above. However it’s quite common for customers (especially larger ones) to use multiple AWS accounts - sometimes many hundreds. The question is, how do you manage costs across a large number of accounts in this way? Do you just leave it to the individual teams to deal with their own bills? To help with this, the concept of Consolidated Billing and - later on - Organisations (and yes, strictly speaking I should be spelling it with a ‘z’ but I’m from the UK so I can’t help myself) were introduced.
The idea behind organisations is that you can take multiple AWS accounts and group them together to allow you to centrally manage them. Once the accounts are added to the organisation, you can do several things:
-
You can use consolidated billing to pay the bill for all accounts from a ‘master account’.
-
You can use policies to control what users of the accounts are able to do - for example, deny access to certain services.
Organisations have the concept of organisational units (OUs) to further group accounts together and make it easier to apply policies to those accounts. In the following screenshot, I’ve created an organisation called ‘Adam-Org1’, with two OUs underneath it (‘Adam-OU-1’ and ‘Adam-OU-2’):
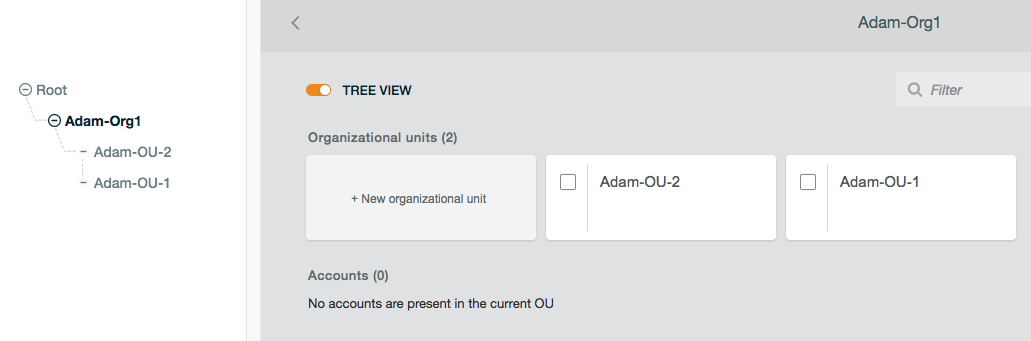
I also have two accounts - I’ve added one into OU-1 and the other into OU-2 (only OU-1 shown here):

The process for adding accounts into an organisation is straightforward - you can either create new accounts from within the organisation view, or you can invite existing accounts to join the organisation, after which an administrator from the invited account needs to approve.
Service Control Policies
Service Control Policies (SCPs) allow administrators within an organisation to control exactly what users are allowed to do within an individual account. Technically, an SCP determines what administrators can allow the users or roles in their account to do - so if an SCP allows the ‘AttachLoadBalancers’ action for the EC2 Auto-scaling service, then the administrator of the account to which the SCP is attached can grant permissions for that action to users and roles within the account.
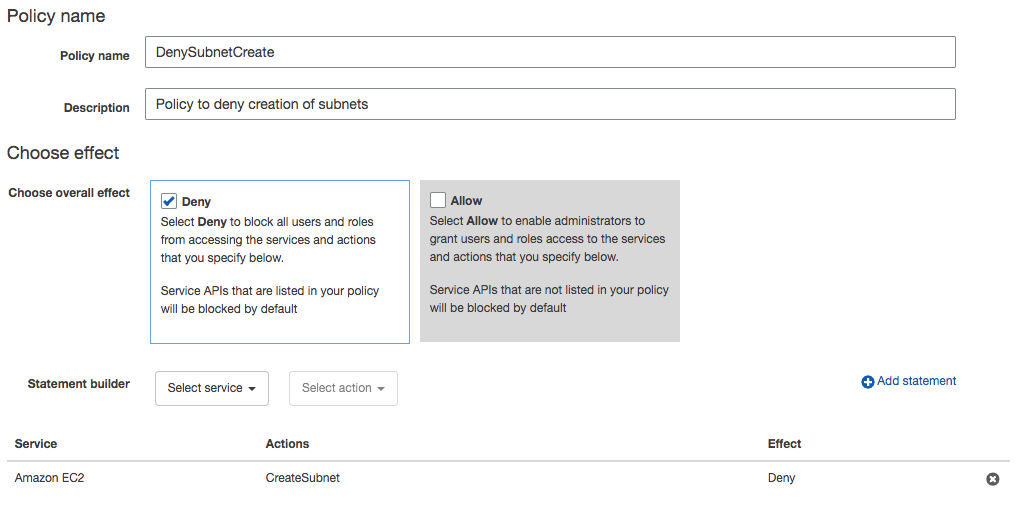
Here’s a quick example: in the screenshot below, I have created a ‘deny’ SCP which includes the ‘CreateSubnet’ action for the EC2 service. If I attach this SCP to an account (or to an OU that includes that account), the administrator will not be able to grant permissions to any role or user for that action, therefore no-one within that account will have the ability to create subnets.
Amazon Resource Names (ARNs)
To finish off this post, I’ll quickly touch upon Amazon Resource Names (ARNs). An ARN is a unique identifier given to all resources that you create within AWS. It’s a very common requirement to need to be able to refer to other resources (for example, when you need to refer to a specific IAM role from another service) and the ARN is often used for this purpose. Let’s have a look at a typical ARN and break it down into the various parts:

The exact format of the ARN varies depending on which type of resource you are talking about. As an example, the S3 (Simple Storage Service) doesn’t require an account number or region in the ARN, so you would typically see something like this, where those values are omitted:
arn:aws:s3:::my_bucket
OK, that’s it for this post - hopefully you found this useful. Next up, I’ll be introducing you to the different ways you can use to interact with AWS, such as the console, CLI and SDKs.